Use WorldCat knowledge base to feed proxied e-resources to Google Scholar
Introduction
You can integrate WorldShare Collection Manager with EZproxy for optimal access to e-resources in Google Scholar. This integration enables you to harvest Google Scholar links and display your proxied e-resources, maximizing the accessibility and visibility of their collections on Google Scholar's platform.
To set up this integration, you must have:
- An EZproxy subscription
- An OCLC Cataloging & Metadata Subscription (which includes access to WorldCat knowledge base)
- Access to Google Scholar
- Correct roles for Collection Manager assigned to library staff in their OCLC account
To request ordering information about EZproxy and WorldShare Collection Manager, see:
- oc.lc/ezp-ordering
- oc.lc/cm-ordering
Set up Collection Manager
- Sign in to Collection Manager using your library-specific URL for accessing WorldShare.
- Navigate to Metadata > Collection Manager.
- Click Search in the left navigation.
- Identify the e-resource collections from the knowledge base that you want to integrate with Google Scholar.
- Select the e-resource collections you want to include in Google Scholar by enabling them. Leave any unwanted collections disabled.
Configure EZproxy and Google Scholar settings
- Navigate to Institution Settings > Proxy and Authentication> Proxy.
- Select the EZproxy radio button for Proxy Type.
- Enter the EZproxy base URL in the Base URL text field.
- (Optional) Enter a username and password for debugging purposes only.
- (Optional) Select Temporarily Disable for WorldCat Discovery and WorldCat.org.
- Click the Google Scholar tab.
- Google Scholar tab - Image
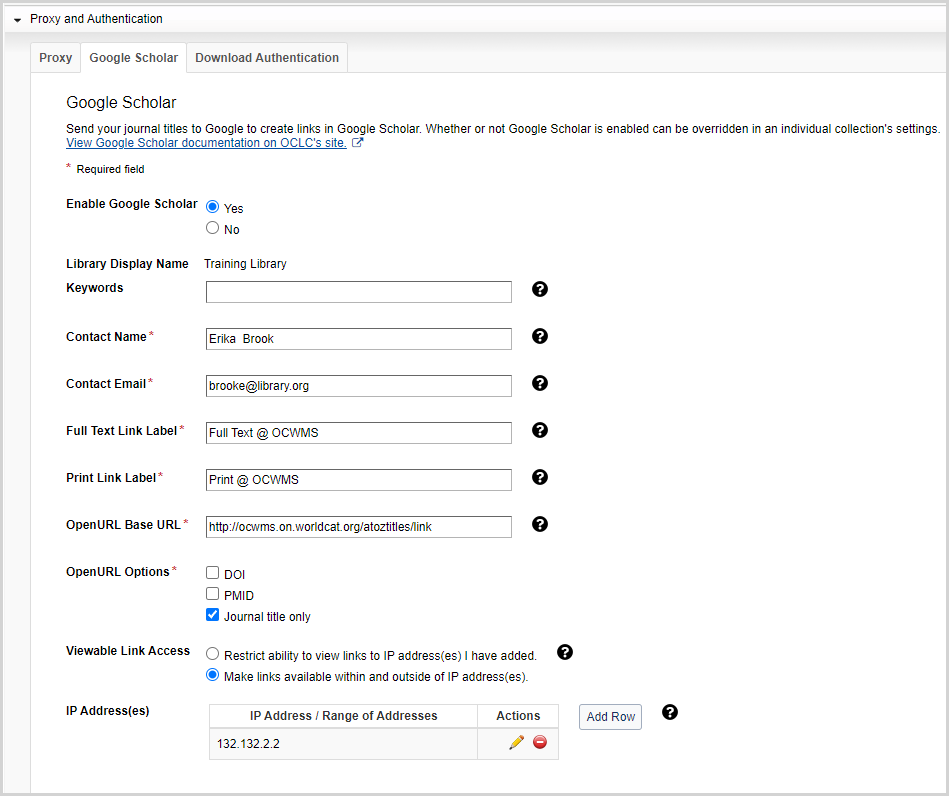
- Enter or verify the following:
- Library display name
- Keywords
- Contact name
- Contact email
- Full text link label
- Print link label
- OpenURL base URL
- OpenURL options
- Viewable link access
- IP address(es)
Note: For detailed information on entering the required data in this section, see Proxy and Authentication > Google Scholar.
Enable the default setting and collection-specific preferences
Once you have enabled Google Scholar in your Institution Settings > Proxy and Authentication > Google Scholar, default settings will be active within each collection’s settings. To export your holdings to Google Scholar, enable or edit the collection-level settings as needed. To do this:
- Select Collection as the Data Type from the drop-down list and select My Selected Collections as the Scope from the drop-down list.
- Click Search. The collections to which your library subscribes will appear in the right pane.
- Select Google Scholar from the Filter by drop-down list to manage and view the status of your collection for Google Scholar integration.
- Click the name of the collection whose setting you wish to modify to open it.
- Expand Holdings and MARC Records.
- Edit the Export to Google Scholar setting.
- Use institution setting: Google Scholar is enabled (If the institution setting is disabled, this will say Google Scholar is disabled)
- Disable for this collection
- Click Save.
Verify your holdings in Google Scholar
After configuring Google Scholar settings in Collection Manager and waiting three to four weeks for harvesting, your library’s holdings to your e-resources will be discoverable in Google Scholar.
- Visit https://scholar.google.com.
- Click the Menu button (
 ) and then click the Settings button (
 ).
). - Select Library links from the Settings menu.
- Search for your library using the Library Display Name or keywords you entered in Google Scholar's institution settings.
- Select your library and click Save.
- Search Google Scholar for an item you know was in the export to Google Scholar.
- Select the link for your institution to verify that you can access the article—via the EZproxy proxy prefix link—to your e-resource.
Existing link resolver set-up
If your library already has Google set up with another OpenURL link resolver, the following steps need to occur before setting up the WorldCat OpenURL link resolver:
Note: Google will only set up one link resolver at a time for your library’s account.
- Contact Google: Reach out to Google and request them to remove or unlink the existing link resolver associated with your library’s account.
- Activate WorldCat OpenURL link resolver: After Google has removed or unlinked the existing link resolver, set up the WorldCat OpenURL link resolver.