Additional configuration options for Scanner 7
Black border removal
To configure the option to remove black borders automatically
- Launch the Scanner7 application.
- Enter a valid request into the scanner application.
- Scan a page.
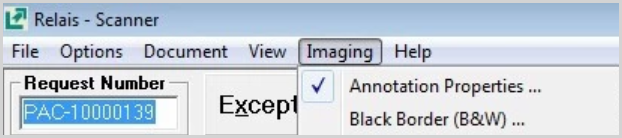
- Click on Imaging > Black border (B&W)…
- Set the following values
- Border Percent = 60
- White Nosie Length = 10
- Variance checked = True
- Variance = 9
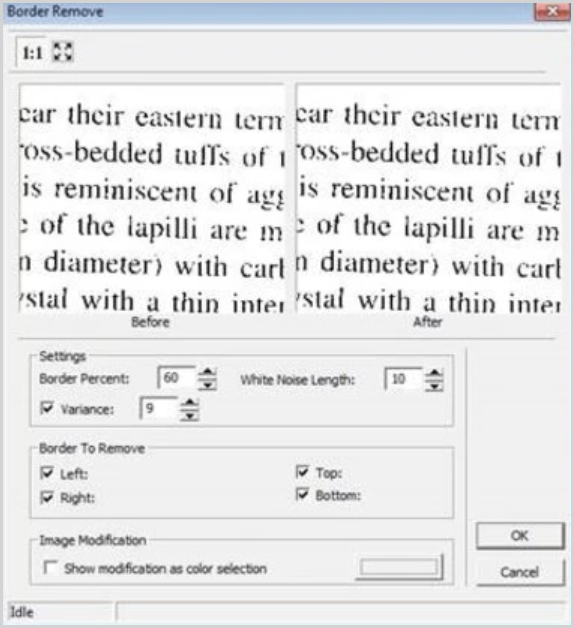
This option has been tested with the Fujitsu fi-6750s and 5750c. Other scanners may see varied results.
Change the directory where documents are saved
The default directory to which documents are saved is relais\scanner, to change the directory to use:
- Login to Administer Settings.
- Select the Application Settings tab.
- Open the Processing section.
- Highlight Scanner.
- Click Edit Extended Settings to display the Extended Scanner Settings.
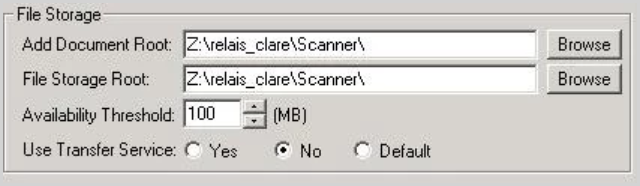
- In the File Storage section change the File Storage Root by browsing to the directory to which documents should be saved.
- Click Ok.
- The new setting will take effect the next time the scanner application is opened.
Change the scanner and TWAIN driver
If you acquire a new scanner then the TWAIN driver used by Relais, it has to be updated. Prior to making the update, install the new scanner and the TWAIN driver. Make sure you can scan using the TWAIN interface.
To update the TWAIN driver in Relais:
- Double click the scanner icon to display the Scanner screen.
- From the Document menu, select Scanner Interface > TWAIN – driver name.
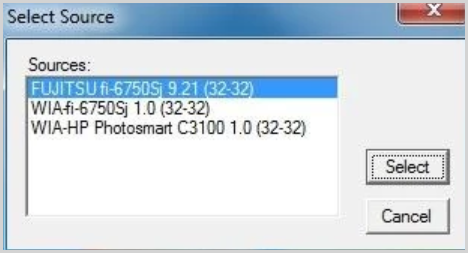
- The Select Source pop up box displays
- Highlight the TWAIN driver to switch to, click Select.
Note: It is not necessary to shut down and reopen the Scanner application.
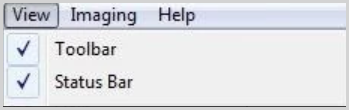
Hide and display the button or status bar
To hide or display the button bar at the top of the scanning screen:
- Open the scanner screen, from the View menu.
- Select or deselect Toolbar or Status Bar as preferred.
Set the default paper size button
Note: Applicable only for Fujitsu scanners.
To change the paper size that is selected by default:
- Login to Administer Settings.
- Select the Application Settings tab.
- Open the Processing section.
- Highlight Scanner.
- Click Edit Extended Settings to display the Extended Scanner Settings.
- In the Paper Size Buttons section for the Default select the preferred paper size from the drop down list.
- Click Ok.
- The new setting will take effect the next time the scanner application is opened.
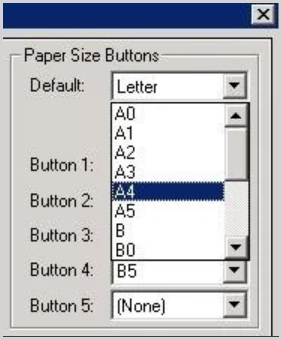
Set the paper-size buttons
Note: Applicable only if not using the scanner's TWAIN interface.
To change the options for the paper size button options and the order in which they are displayed on the scanner screen:
- Login to Administer Settings.
- Select the Application Settings tab.
- Open the Processing section.
- Highlight Scanner.
- Click Edit Extended Settings to display the Extended Scanner Settings.
- For each of Button 1 through Button 5 set the preferred paper size.
- Click Ok.
- The new setting will take effect the next time the scanner application is opened.

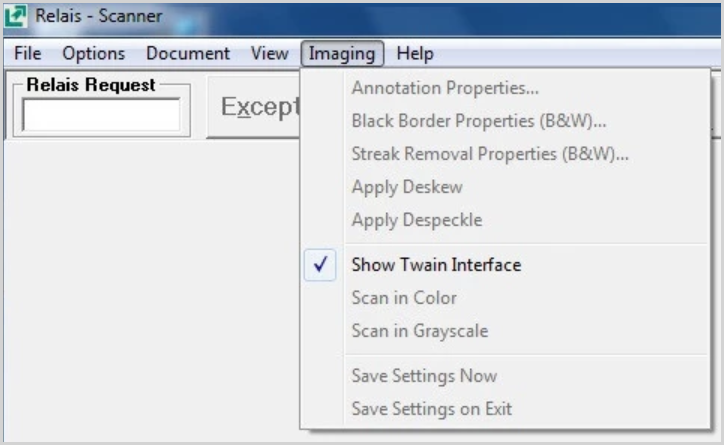
Use the scanner's TWAIN interface
Specify whether scanning is controlled through the Relais scanner interface or whether to use the scanner's own TWAIN interface. In some cases, e.g., if not using a Fujitsu scanner, using the scanner's TWAIN interface may be the only option.
To show and use the scanner's TWAIN interface:
- Double-click the scanner icon to display the Scanner screen.
- From the Imaging menu, check Show Twain Interface.
O
- Login to Administer Settings.
- Select the Application Settings tab.
- Open the Processing section.
- Highlight Scanner.
- Click Edit Extended Settings to display the Extended Scanner Settings.
- In the Show Twain Interface section select Yes.
- Click Ok.
- The new setting will take effect the next time the scanner application is opened.
To show and use the Relais scanner interface:
- Double-click the scanner icon to display the Scanner screen.
- From the Imaging menu, uncheck Show Twain Interface.
O
- Login to Administer Settings.
- Select the Application Settings tab.
- Open the Processing section.
- Highlight Scanner.
- Click Edit Extended Settings to display the Extended Scanner Settings.
- In the Show Twain Interface section select No.
- Click Ok.
- The new setting will take effect the next time the scanner application is opened.