About routing lists
Use Search Auto
The routing list for a request can be created automatically by Search Auto or by staff (using Search Manual or Request Routing).
Routing lists created through Search Auto uses the locations from the search and creates a routing list based on the supplier sequence defined for the Request Type and Delivery Type.
There is no active code in Relais to automatically add locations to the end of an existing routing list.
Load balancing
When a routing list is created automatically if there are several suppliers from a tier, then load balancing is used to determine the order in which to use them.
Note: In V2010.5 the following new section is added to the relais.ini as part of the upgrade process.
[Load Balancing]
Within the default [Login] section the following new settings will be added:
FirstEditRequestInfoTab=1
FirstAdditionalInfoTab=1
UseDiscoveryForCatalogSearch=N
DisplayItemTypeInLoanDocument=N
ItemTypeRequired=N
Manually
- Open a request and click Request Routing (this can be done from Search Manual, Query Requests, Review Queue).
- From the Available Suppliers list highlight the supplier code to add to the routing list.
- Double-click the supplier code to add it to the routing list (or click Add to List). Repeat this step until all desired suppliers are added.
- To delete a supplier code, select the supplier code and then click Delete.
- To use the preferred sequence for this Request Type and Delivery Type, click Sequence. The order of the routing list is changed based.
Note: If multiple suppliers from a single tier are added to the routing list, when the Sequence button is used, these suppliers are sorted in alphabetical order - load balancing is not used. - To move a supplier up or down in the routing list, select the supplier code and use the up or down arrows as appropriate.
- (Optional) Click Update.
- Click Submit Request.
With an OCLC lender string
It is possible to add OCLC as a supplier to the routing list for a request.
When sending a request to OCLC it can be sent using one of 3 OCLC service types.
When using Direct to Lender an OCLC lender string must be included in the request.
To create an OCLC lender string.
- Login to Search Manual - Requesting (or any appropriate instance of Search Manual configured to include OCLC WorldCat).
- After the request displays, click on the WorldCat tab.
- Retrieve the desired bibliographic record.
- Click the box next to the Location = OCLC.
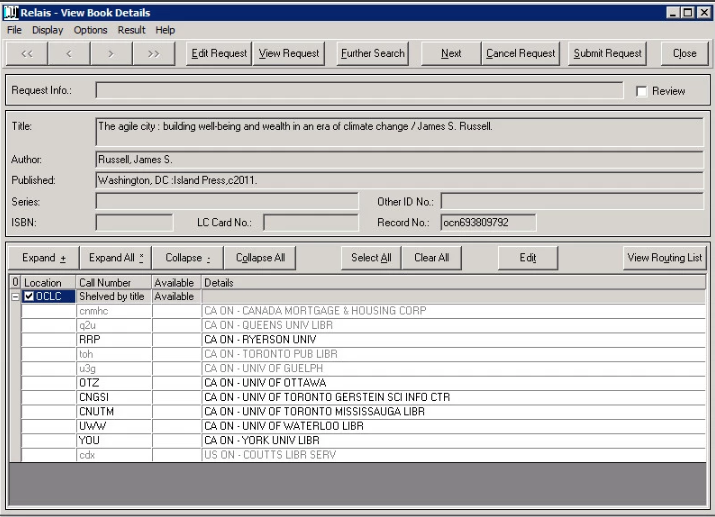
- The OCLC Request screen displays.
- The symbols for any locations that are not available as lenders are in lowercase and cannot be selected.
- The display of possible locations may vary, geographically close locations appear first.
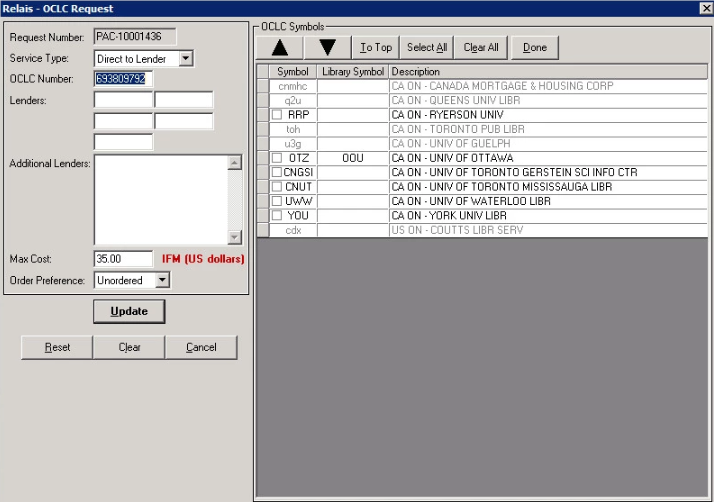
- Select the locations to include in the lender string and use the up and down arrows to set the order.
- Click Done to transfer the lender string to the Lenders boxes on the left side of the screen.
- The Order Preference defaults to Unordered and there is no override setting.
- The order of the locations is:
1 2
3 4
5
In addition, it is possible to enter any OCLC symbol in a Lenders box.
Note: This is how the initial testing with OCLC will be done, i.e., by entering a test OCLC symbol (provided by OCLC).
- Once the lender string is created, click Update to display the View Details screen.
- Continue to look for additional or alternate suppliers, modify the Routing List etc.
- Once the request is ready, click Submit Request.
Use additional lenders
OCLC only allows five lenders to be sent in an ISO ILL request. Once those 5 lenders have been exhausted OCLC replies with an unfilled message and considers the request complete in OCLC. If Additional Lenders have been captured staff have the option of editing the request to replace the 5 initial lenders in the lender string with one or more of the additional lenders as follows;
- From Query Request search for the request to be updated.
- Select the Request Routing option from the Query screen.
- In Request Routing highlight the OCLC supplier record and click Edit to display OCLC Request.
- Staff can now manually replace the initial lenders with lenders from the Additional Lenders.
- If less than five additional lenders are being updated, make sure the remaining old lenders are deleted from the lenders list.
- Click the Update button to save the new lender string and return to Request Routing.
- If the OCLC supplier record is not at the top of the routing list use the arrows to move it to the top.
- Click the Submit button to resubmit a new request to OCLC.