Loan an item (using Windows Login)
Loan to your own patron or another library
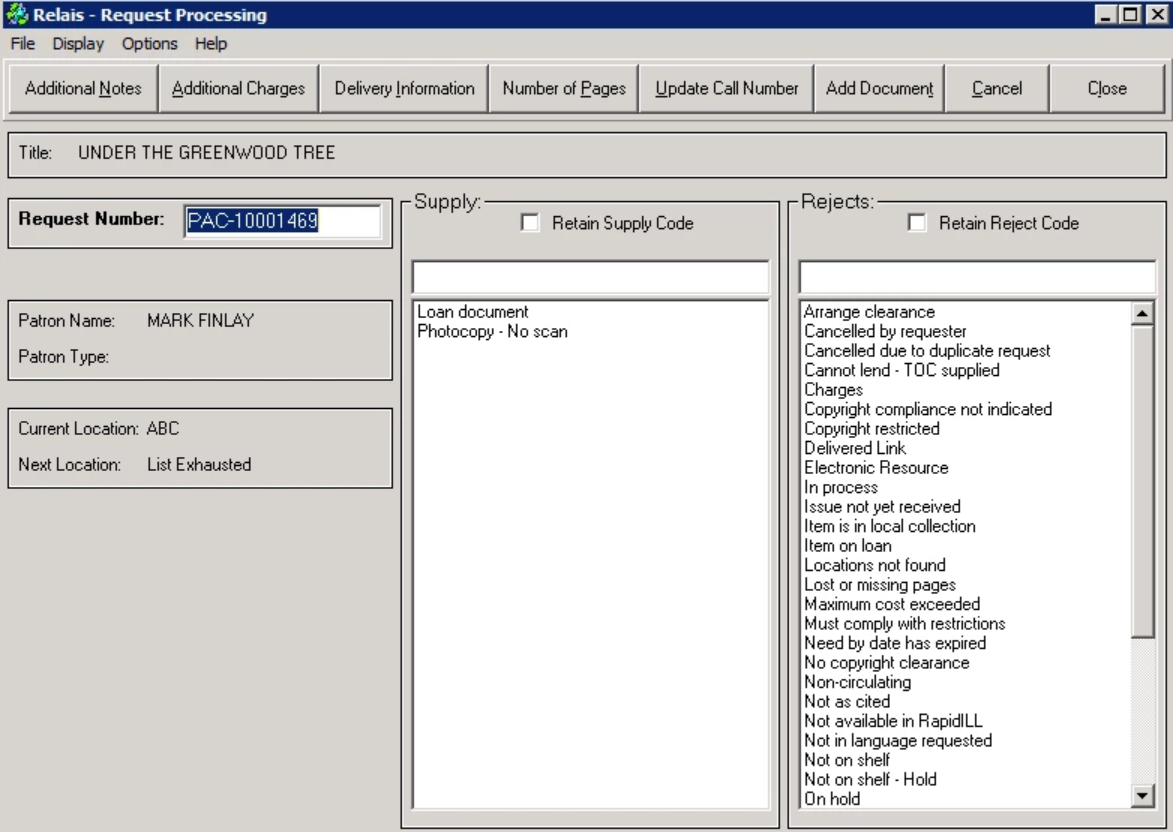
To update a request as a loan (either to your own patron or to another library)
- Login to Request Processing (alternatively, login to Query Request -> retrieve the request -> click Request Processing).
- Enter the request number - this can be done by keying in the number and then pressing enter or by wanding/reading the barcode on a Relais pickslip.
- When keying in the request number, lowercase letters are converted to uppercase automatically.
- The title of the request is displayed allowing staff to confirm the appropriate request is displayed.
- Either the Patron Name and Patron Type or Institution and Library Name is displayed.
- The current location (or supplier) and the next location (or supplier) from the routing list is displayed. If there are no more locations in the routing list (after the current location) then the Next Location shows: List Exhausted.
- Select the supply code that appears in the Supply column, for example: Document Loaned (LON).
Loans in a shared system
In a shared system, only one loan code displays, based on whether the request is:
- from your own patron: Document Loaned (LON)
- from another member library: Document Sent (SHP) or
- from an external library: Document Loaned (LON)
Other supply codes may display in this column but there is only one code for updating loans.
- In order for the above logic to work:
- Make sure that all supplier records for member libraries, i.e., in the shared system, have Supplier Category = Internal
Make sure that all other supplier records have Supplier Category = External
Updating multiple loans
If updating multiple requests as loans in one batch, click the Retain Supply Code box.
- If this box is selected, after one request is updated and the next request number is entered, the same Supply code is already selected.
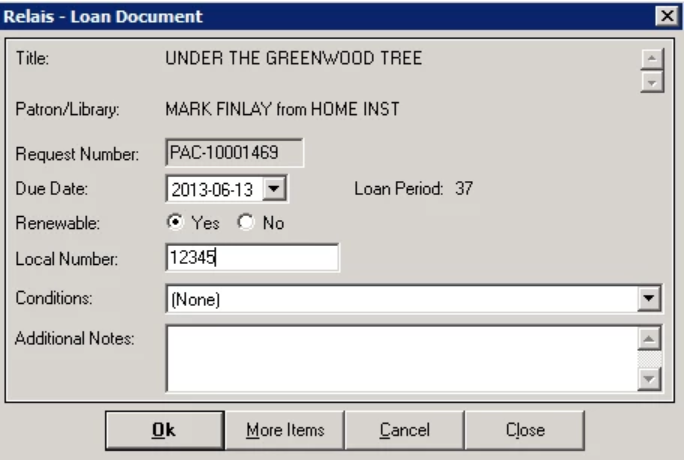
- The Loan Document pop-up box displays.
- Enter or update the information as described below.
- Click Ok (if there is only one physical to loan).
- If there are multiple physical items to loan, click More Items.
Updates after the loan code is assigned
Once staff clicks Ok, a series of updates are done.
- In the default RequestFlow the request is moved to the delivery process (Local Print) for coverpages to print.
- If the Delivery Method and if there is an email address for the requester, a Pickup Notice is also sent.
- The Next Location is updated to: Delivery
- If NCIP is in use
- For a request from another library a CheckoutItem message is sent to the local library system.
- For a request from a patron, an AcceptItem message is sent to the local library system.
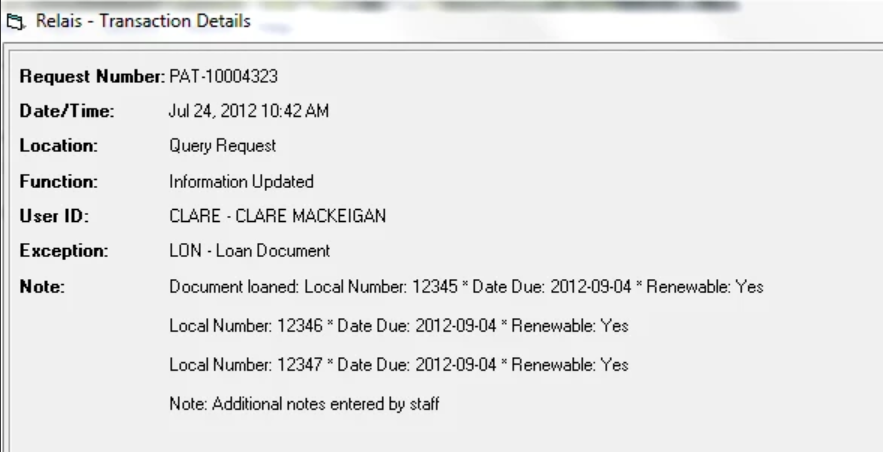
- An audit record is added to the request and a loan tracking record is created.
- If the request is from another library this record tracks the loan to the library.
- If the request is from a patron, this record tracks the loan to the patron.
In a shared system, two loan tracking records are created.
- The loan from the supplying to the other member library.
- The loan from the requesting library to the patron.
Each of these loans is tracked separately.
Following is an example of the audit record for the two separate loans:

| Campo | Characters | Descripción | NCIP notes |
|---|---|---|---|
| Title | The title from the request. Non-editable | ||
| Patron/Library | The name of the patron or the requesting library. | ||
| Número de solicitud | Non-editable | ||
| Fecha de vencimiento | The due date is displayed. This date is based on the loan code for the patron or library record. This date can be modified for example when loaning a document to a patron, the due date is set based on the due date set by the supplying library. This due date is recorded in the loan tracking record for this request and is used when calculating whether or not an item is overdue. This due date
|
The due date from Relais is ignored. The due date is determined by the local library system when the Check out is done. | |
| Renewable | Select Yes/No. The default value displayed can be modified. The Renewable flag Yes or No
|
||
| Local Number | 15 | Mandatory. Key or wand in the barcode number for the book. Once the loan tracking record is created, the request can be retrieved using this local number. |
When loaning a book to another library this barcode is included in the CheckoutItem message sent to the local library system. When loaning a book to a patron, enter a barcode or number that the local library system is able to use when creating the temporary bib and item record. |
| Conditions | If relevant, select any conditions of use. Note, this list of conditions is not configurable. If selected, this information
|
||
| Additional Notes | 254 | Enter any additional notes for the requester. If added, these notes
|
- Open another request
- If Retain Supply Code is checked, as soon as the request is opened the Loan Document pop-up box is displayed.
- Close after all requests are updated.
At the time the request number is entered, possible error messages are:
- "This is not a valid request number" = a request number has been entered that is not in the correct format. Click OK and enter a valid request number.
- "Incorrect Request Number, Please try again" = an invalid request number has been entered. This may be a request number that does not exist or a request not at Scan or Update. Click OK and enter the correct request number.
Loan multiple items for one request
- If there are multiple physical items to loan for a single request, click More items (instead of Ok) the Loan Document pop-up box displays again.
- Enter/change all the appropriate information including a unique local number for this item.
Note: Any Additional Notes entered are recorded for the request, not for each separate physical item - Click Ok, if all requests for this item are loaned, or click More Items if there are additional items to loan for this request.
- The information as recorded in the audit record:
- A separate loan tracking record is created for each physical item loaned.
- A single cover page is printed for the request.
Configure the default for the Renewable flag
By default the value for the Renewable flag in Loan Tracking the default value is set to Yes.
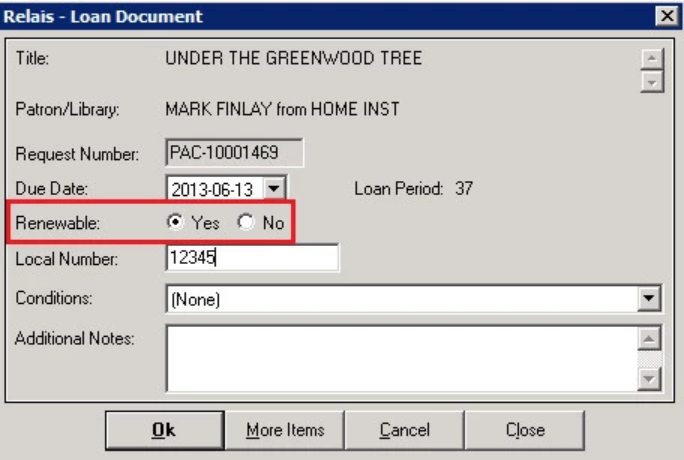
To change the default value for the Renewable flag to No.
- In the relais root directory open Processing.cfg (using Notepad)
- Change
LOAN_Default_RENEW_FLAG=Y
to
LOAN_Default_RENEW_FLAG=N
- Save the updated version of Processing.cfg
The new default value takes effect next time Login is opened