WorldShare Acquisitions Release Notes, October 2022
Release Date: October 27, 2022
Introduction
This release of WorldShare Acquisitions provides 8 new features and enhancements in addition to numerous bug fixes. These features will help you manage more complex workflows, including:
- Transferring amounts between funds on a budget
- Viewing the budgeted amount history for a fund
- Using the Expected Fulfillment Date for an order item
- Using the Vendor Response field for an order item
- Using the Requires Attention field for an order item
- Importing EDIFACT order response data
- Improvements to the budget page
- Using a new matching algorithm for import of MARC order data
Many of these enhancements are the direct result of your feedback.
Recommended actions
For this release, we recommend that you review the following checklists and complete the relevant tasks so that you can adjust your policies and workflows and train your staff. These checklists identify updates that we have determined as significant for most institutions. We encourage you to review all of the items in the release notes to determine whether there are other items that might require additional action or follow up by your institution.
Administrative actions
These items require immediate action or decisions.
| Action |
|---|
|
Educate staff on the new way to transfer money between funds on a budget. |
Follow-up actions
In an effort to keep your staff informed of new features and changes, you may also want to consider these items.
| Action |
|---|
|
Set vendor and institution settings for Expected Fulfillment period, in order to better set the default Expected Fulfillment Date for One-Time Monographs and One-Time E-Products. |
| Consider changing saved searches related to claiming order items by using the Expected Fulfillment Date in the saved search (see details below). |
| If sending order data to vendors via EDIFACT, inquire with vendors whether they also support sending order item updates using EDIFACT order response data. If so, consider importing this data manually or via an automated job. |
| Instruct staff on the new budget page improvements, including new ways to expand/collapse all funds, edit funds, and delete funds. |
New features and enhancements
Transfer amount between funds on a budget
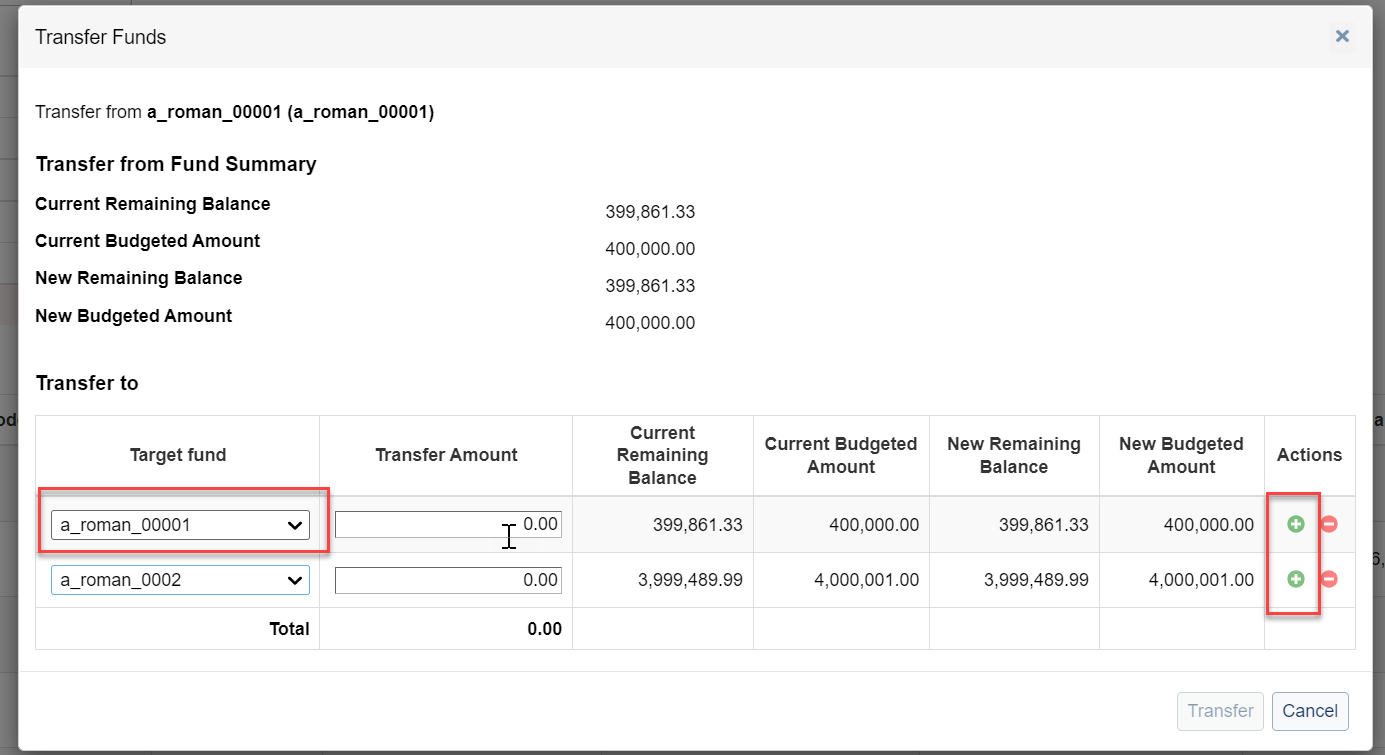
You can now transfer money from one fund to one or more other funds on a budget. This saves you the time and effort of manually adjusting the budgeted amounts of the funds in question. Instead, you can simply use the transfer functionality to accurately adjust the budgeted amounts for all funds in the transaction. Previously, the only way to transfer amounts between funds was to manually edit the budgeted amount of the source fund and all target funds. This was time-intensive and error-prone. Now, you can simply select the source fund and enter the funds you want to transfer to and the respective amounts, and the system will calculate the corresponding changes for you. In the future, there will even be a way to view the details of a transfer in your budgeted amount history.
To transfer money between funds:
- Open the budget page.
- For the fund you want to transfer money FROM, click the ". . ." button in the action column.
- Select Transfer from the menu.
- In the Transfer dialog, under "Transfer to" select the fund from the autocomplete that you want to transfer money TO.
- If you want to select multiple funds, use the "+" icon to add a new row and select a fund from the autocomplete box (you can select up to 5 target funds).
- If you want to select multiple funds, use the "+" icon to add a new row and select a fund from the autocomplete box (you can select up to 5 target funds).
- Enter the amount you want to transfer into that fund to the right of the selected fund. Enter as many amounts as you want.
- Note: The amount that you transfer FROM the fund at the top is equal to the sum of the amount you want to transfer TO the target funds at the bottom of the dialog. This sum is displayed in the Total amount field at the bottom of the dialog.
- Note: The amount that you transfer FROM the fund at the top is equal to the sum of the amount you want to transfer TO the target funds at the bottom of the dialog. This sum is displayed in the Total amount field at the bottom of the dialog.
- Also note that the following is displayed for the FROM and TO funds:
- Current Remaining Balance - the Remaining Balance (Budgeted Amount - Encumbrances and Expenditures) for the fund before the transfer.
- Current Budgeted Amount - the Budgeted Amount for the fund before the transfer.
- New Remaining Balance - what the Remaining Balance (Budgeted Amount - Encumbrances and Expenditures) will be for the fund after the transfer.
- New Budgeted Amount - what the Budgeted Amount for the fund will be for the fund after the transfer.
- These amounts can aid you in the transfer in many cases, such as the following:
- You want to transfer all remaining money out of an existing fund. (Make sure the New Remaining Balance of the source fund at the top of the dialog is 0.00.)
- You want to transfer enough money into the target funds to cover overages. Make sure the New Remaining Balance of the target funds at the bottom of the dialog are 0.00.)
- You want to make sure that the Budgeted Amount for the source fund (at the top of the dialog) is a certain amount after the Transfer. (See the New Budgeted Amount field at the top of the dialog.)
- Press transfer.
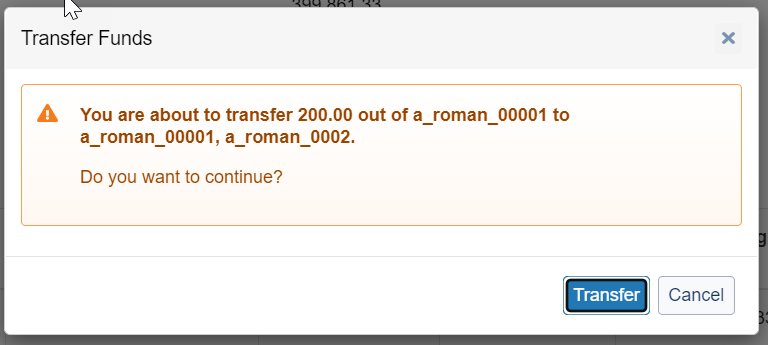
- You will be asked to confirm the transfer amount. Confirm the transfer.
- Transfer is completed.
- For information on how transfers appear in the Budgeted Amount history, see the feature details below.
View the budgeted amount history for a fund
You can now view the history of changes to the Budgeted Amount field on a fund. This includes the initial allocation to the fund, any subsequent manual edits to the budgeted amount, and even transfers (using the new transfer amount functionality above). This saves you time storing notes about these types of changes on the fund outside of Acquisitions. Previously, you could make notes about changes to the Budgeted Amount on the fund, but there was no way to actually view changes made to the Budgeted Amount over time. Now, you can easily view this information for a fund.
Note: There is currently a problem with the data query that means only changes to the budgeted amount from July 2022 or after are currently displaying in the budgeted amount history table. This will be rectified in the next two releases and all changes to the budgeted amount history going back to January 2019 will be shown.
To view the budgeted amount history for a fund:
- On the budget page, locate the Budgeted column in the list of funds.
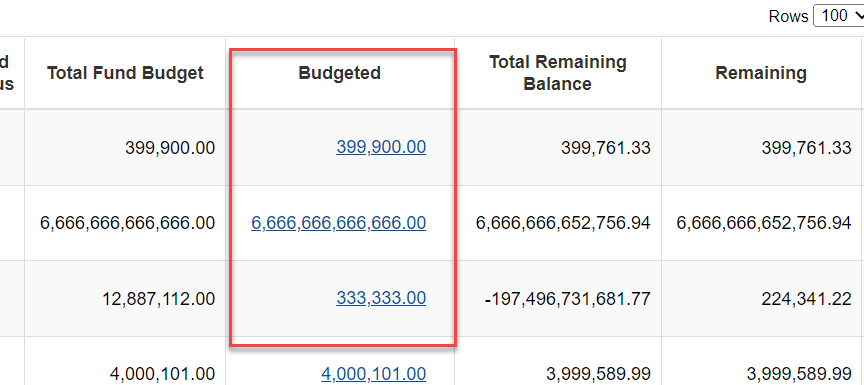
- The value of the Budgeted column should now display as a link. Click on this link.
- A table will display in a dialog with the following columns:
- Date - The date of the change to the budgeted amount. The most recent change appears at the top.
- User - The name of the user who made the change to the budgeted amount.
- Change - The amount of the change to the budgeted amount, whether positive or negative.
- New Budgeted Amount - The value of the Budgeted Amount after the change.
- Type of Operation - The type of change that made the update to the Budgeted Amount. This includes the following:
- Create - Budgeted Amount set on the creation of the fund.
- Update - Budgeted Amount at the time of the manual edit of a fund.
- Transfer - Budgeted Amount was changed via the Transfer functionality documented above. (In the future, this type will be a link that will direct users to a dialog displaying the specific details of the transfer. This is shown in the screenshot below.)
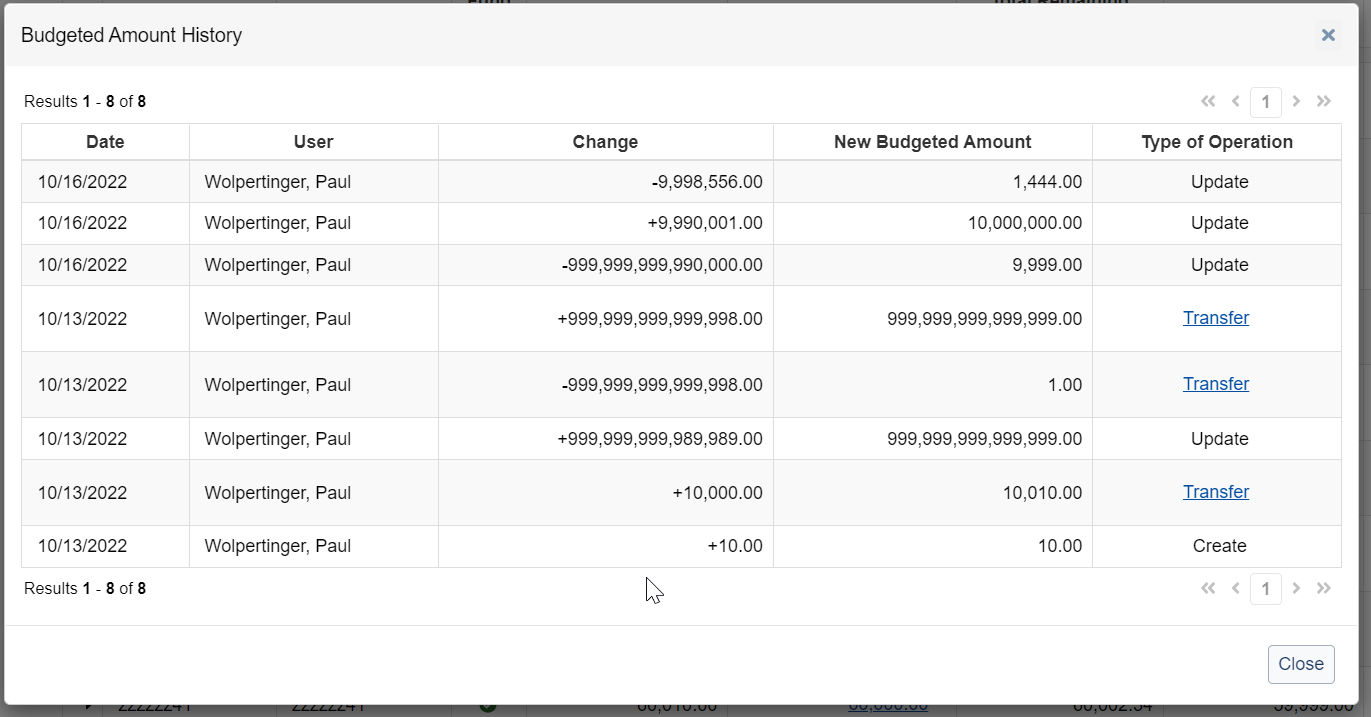
- You can page through this history to see earlier changes.
- Note: A full history might not be available for funds many years old. It will go back to January 2019 at the oldest.
View or edit the Expected Fulfillment Date for an order item
You can now view or edit a new Expected Fulfillment Date field for an order item. Additionally, you can filter order items by this field. This saves you the time and effort of tracking the Expected Fulfillment Date of items using the notes field or custom fields. It also aids in claiming, in that you no longer have to base claims on the number of days since the order date, but can instead base it on the number of days since the Expected Fulfillment Date. You can even configure how you want the default value for the Expected Fulfillment Date to be set for One-Time Monographs and One-Time E-Products at both the institution and vendor level. As detailed below, you can also enter or import a date provided by the vendor. Previously, you needed to track this information in a note or custom field, but now, you can use a dedicated order item field for this.
To configure the default Expected Fulfillment Date for the institution:
- Go to Settings > Administration.
- Open the "Receiving and Local Holding Record" accordion.
- Under Expected Fulfillment Period, enter the number of days after the order date (for purchase order items) or create date (for plan order items) to set for the Expected Fulfillment Date. There are 2 fields, one each for:
- One-Time Monograph order items (order items with Acquisitions Type = One-Time and Processing Type = Monograph)
- One-Time E-Products (e.g. ebook) order items (order items with Acquisitions Type = One-Time and Processing Type = E-Product)
- If you do not want the Expected Fulfillment Date set by default, leave these fields blank.
- Note: These are institution settings, so they will apply to all order items meeting these criteria for all vendors, unless it is overridden at the vendor level. To set these defaults at the vendor level, see the instructions below.
To configure the default Expected Fulfillment Date for a vendor:
- Search for the vendor you want to configure.
- Open the vendor page.
- Under Acquisitions Settings, see the section for Expected Fulfillment Period.
- You can set the number of days after the order date (for purchase order items) or create a date (for plan order items) to set for the Expected Fulfillment Date. There are 2 fields, one each for:
- One-Time Monograph order items (order items with Acquisitions Type = One-Time and Processing Type = Monograph)
- One-Time E-Products (e.g. ebook) order items (order items with Acquisitions Type = One-Time and Processing Type = E-Product)
- If you do not want the Expected Fulfillment Date set by default, leave these fields blank. This system will default to the settings at the institution level. (See above).
To view or edit the Expected Fulfillment Date manually for an order item:
- Find an order item, using either the:
- Order item search - Orders > Order Items
- On an order - Orders > Orders > Click on a specific order.
- Click on the title of the order item from either the order item search or from the order page.
- This will open the order item details page. Open the General tab (this should happen by default).
- In the Expected Fulfillment Date field, you can choose both the:
- Set By option - This determines the source of the Expected Fulfillment Date. This can be set to:
- Vendor (provided by the vendor via e-mail, import file, etc.)
- System (value when the Expected Fulfillment period settings are used to set the Expected Fulfillment Date - see above)
- Staff (can be selected when the library staff overrides the system default with their own date)
- Expected Fulfillment Date - the date that fulfillment is expected for the order item.
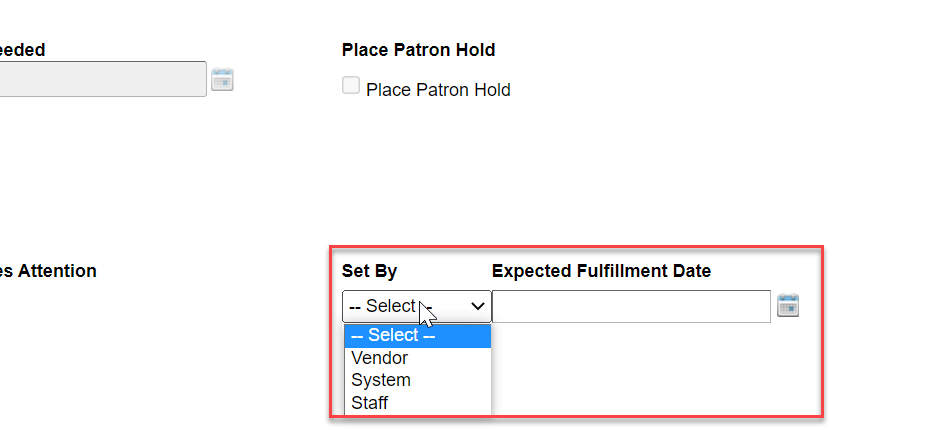
- Set By option - This determines the source of the Expected Fulfillment Date. This can be set to:
- Note: There is no validation to ensure that the Expected Fulfillment Date is after the date ordered, so be careful when setting this value. It can also be set as far in the future as you wish, so be careful in that respect as well.
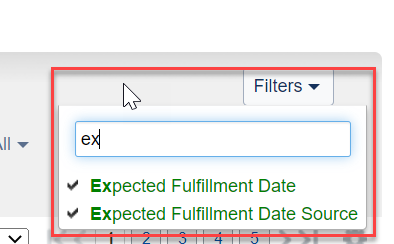
- To search by the Expected Fulfillment Date, open the order item search and select the Expected Fulfillment Date from the list of Filters on the top right of the table. (You can also search by Expected Fulfillment Date Source to search the value of the "Set By" field. This way, you can filter to order items with an Expected Fulfillment Date set specifically by the vendor.)
- The Expected Fulfillment Date filter has a number of options, including:
- More than __ days ago.
- Within the next __ days
- From one date to another date
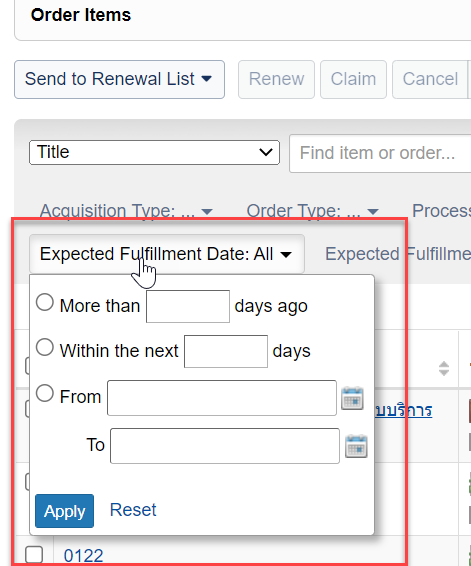
- One possibility for setting up your saved searches for order item claiming is to set the Expected Fulfillment Date filter to More than __ days ago, based on your library, the vendor, or the type of item. (This presumes, however, that you use the Institution or Vendor Expected Fulfillment Period to set a default "system" value for items. Otherwise, only items where you have either manually set or imported the Expected Fulfillment Date will be found.)
View or edit the Vendor Response for an order item
You can now view, edit, and search by the Vendor Response field for an order item. This saves you the time and effort of summarizing the vendor's response to a specific order in a notes field or custom field. This field has 6 possible values:
- Order Confirmed
- Delayed
- Cancelled
- Substitution Available
- Conflicting Codes - Used when the vendor sends two EDIFACT codes in the order response file that conflict.
- Other
You can select one of these values anytime after the order is placed. You can do this based on a vendor e-mail, phone conversation, order response file, etc. You can also search using this field, so that you can see how many items have a specific status, or to filter out a specific status during claiming. Previously, you needed to store this sort of information in a note or a custom field. Now you can store and track it in a dedicated field in the application.
To view, edit or search the vendor response field for an order item:
- Find a placed order item, using either the:
- Order item search - Orders > Order Items
- On an order - Orders > Orders > Click on a specific order.
- Click on the title of the order item from either the order item search or from the order page.
- This will open the order item details page. Open the General tab (this should happen by default).
- In the Vendor Response field, select a value from the dropdown.
- Save your changes.
- To filter by this field, go to one of the order item searches and select "Vendor Response" from the Filters menu, then select the desired values from the resulting filter dropdown.
- To show this field in the order item search, use the gear icon to enable the Vendor Response column. It appears after Create Date and before Requires Attention.
View or edit the Requires Attention flag for an order item
You can now mark an order item as requires attention. This saves time and effort marking items that need attention by the library, especially ones where the vendor has indicated a special status for the item that may require a response. Previously, you needed to indicate this type of information in a note or a custom field, but now, we have a dedicated field for this information.
To view, edit or search by the Requires Attention field for an order item:
- Find a placed order item, using either the:
- Order item search - Orders > Order Items
- On an order - Orders > Orders > Click on a specific order.
- Click on the title of the order item from either the order item search or from the order page.
- This will open the order item details page. Open the General tab (this should happen by default).
- In the Requires Attention field, check the checkbox to indicate the item requires attention.
- Save your changes.
- Note: You can also have items marked as requires attention automatically when importing EDIFACT order response files, if you select this option. See below for more information on importing EDIFACT order response data.
- To filter by this field, go to one of the order item searches and select "Requires Attention" from the Filters menu, then select Yes or No from the resulting filter dropdown.
- To show this field in the order item search, use the gear icon to enable the Requires Attention column. It appears after Vendor Response.
Import EDIFACT order response data
You can now import EDIFACT order response data for order items that you ordered via EDIFACT from the vendor. Many vendors provide EDIFACT order response data for order items that have been ordered by the library via EDIFACT. These files provide data such as:
- Expected Fulfillment Dates
- Status of Item or "Vendor Response"
- This can include whether the item has been cancelled or not.
- Price of the item.
You can now import this data above, as well as also:
- Setting the "Requires Attention" flag for the order item for those items whose status indicates the need to be flagged in this way.
- Cancelling items that have the "Cancelled" status, if this option is selected
This saves the library time and effort manually updating items with these statuses from e-mails or other vendor responses. Now, you can simply import a file with this information.
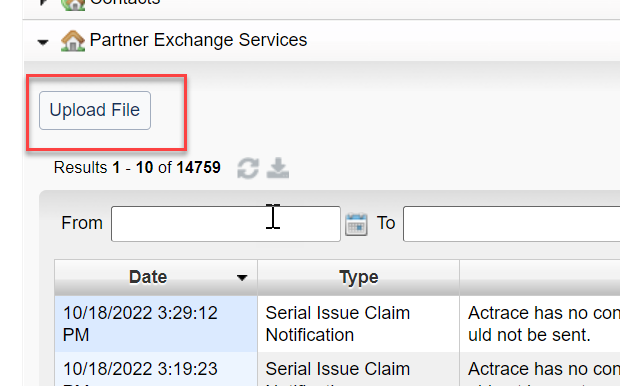
To import an EDIFACT order response file:
- Arrange with the Vendor to send you EDIFACT order response files.
- Pick up the EDIFACT order response files on the vendor's FTP site. (You can also configure an Automated Job to pick up these files. More on this below.)
- Open the vendor for which you want to import an EDIFACT order response file.
- Open the Partner Exchange Services accordion.
- Click Upload File.
- Select Import Order Response Data (EDIFACT) from the dropdown.
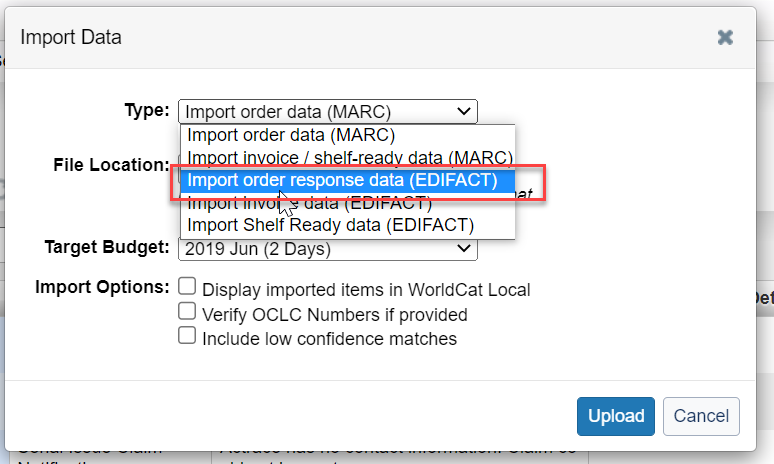
- Select your desired Import Options. These include:
- Mark problem items as "Requires Attention" - This will mark items with any other Vendor Response status besides "Order Confirmed" with the "Requires Attention" flag.
- Cancel unreceived copies, based on vendor response - This will automatically cancel the unreceived copies of the item, if the vendor response is "Cancelled". Please use this feature carefully. You will receive an indication that the item was cancelled in the e-mail notification, but obviously, canceling items based on vendor response can be dangerous if misused.
- Upload the file.
- The file will update the following fields if provided in the file:
- Price (only if provided)
- EDIFACT Action Code - This is a new field on the General tab of the order item details page below the Vendor Response. It can include the following values:
- 100 Order line accepted
- 101 Price query: order line will be held awaiting customer response
- 102 Discount query: order line will be held awaiting customer response
- 103 Minimum order value not reached: order line will be held until required value is reached
- 104 Firm order required: order line will be held awaiting customer response
- 110 Order line accepted, substitute product will be supplied
- 200 Order line not accepted Response to new order, report on outstanding order line
- 201 Price query: order line not accepted
- 202 Discount query: order line not accepted
- 203 Minimum order value not reached: order line not accepted
- 205 Order line not accepted: quoted promotion is invalid
- 206 Order line not accepted: quoted promotion has ended
- 207 Order line not accepted: customer ineligible for quoted promotion
- 210 Order line not accepted, substitute product is offered
- 220 Outstanding order line cancelled: reason unspecified
- 221 Outstanding order line cancelled: past order expiry date
- 222 Outstanding order line cancelled by customer request
- 223 Outstanding order line cancelled - unable to supply
- 300 Order line passed to new supplier
- 301 Order line passed to secondhand department
- 400 Backordered - awaiting supply
- 401 On order from our supplier
- 402 On order from abroad
- 403 Backordered, waiting to reach minimum order value
- 404 Despatched from our supplier, awaiting delivery
- 405 Our supplier sent wrong item(s), re-ordered
- 406 Our supplier sent short, re-ordered
- 407 Our supplier sent damaged item(s), re-ordered
- 408 Our supplier sent imperfect item(s), re-ordered
- 409 Our supplier cannot trace order, re-ordered
- 410 Ordered item(s) being processed by bookseller
- 411 Ordered item(s) being processed by bookseller, awaiting customer action
- 412 Order line held awaiting customer instruction
- 500 Order line on hold – contact customer service (usually because the account is stopped)
- 800 Order line already despatched/stock allocated for despatch
- 900 Cannot trace order line
- 901 Order line held: note title change
- 902 Order line held: note pubdate or availability date delay
- 903 Order line held: note price change
- 999 Temporary hold: order action not yet determined
- EDIFACT Status Code - This is a new field on the General tab of the order item details page below the Vendor Response. It can include the following values:
- AB Publication abandoned (cancelled by publisher)
- AD Apply direct: item not available to trade
- AU Publisher’s address unknown
- CS Status uncertain: check with customer service
- FQ Only obtainable abroad
- HK Paperback out of print: hardback available
- IB In stock (at wholesaler or bookseller)
- IP In print and in stock (at publisher)
- MD Manufactured on demand
- NK Item not known (we cannot trace) - see also SN
- NN We do not supply this item
- NP Not yet published
- NQ Not stocked
- NS Not sold separately
- OB Temporarily out of stock (at wholesaler or bookseller)
- OF This format out of print: other format available
- OP Out of print
- OR Out of print: (to be) replaced by new edition
- PK Hardback out of print: paperback available
- PN Publisher no longer in business
- RE Awaiting reissue
- RF Refer to other publisher or distributor
- RM Remaindered
- RP Reprinting
- RR Rights restricted (cannot supply in this market)
- SD Sold (for unique copies of secondhand/antiquarian items)
- SN Our supplier cannot trace - see also NK
- SO Pack/set not available: available as single items only
- ST Stocktaking: temporarily unavailable
- TO Only to order
- TU Temporarily unavailable, reason unspecified
- UB Item unobtainable from our suppliers
- UC Unavailable; may or may not become available again (“reprint under consideration”)
- EDIFACT Last Updated Date - This is set automatically to the date that the file was uploaded.
- Vendor Response - This is set based on a mapping between the EDIFACT Action Code and EDIFACT Status Code and a Vendor Response value. This is a 3-step process:
- Map the EDIFACT Action Code to a specific Vendor Response field value:
EDIFACT Action Code Descripción Vendor Response Field Value 100 Order line accepted Order Confirmed 101 Price query: order line will be held awaiting customer response Other 102 Discount query: order line will be held awaiting customer response Other 103 Minimum order value not reached: order line will be held until required value is reached Other 104 Firm order required: order line will be held awaiting customer response Other 110 Order line accepted, substitute product will be supplied Order Confirmed 200 Order line not accepted Cancelled 201 Price query: order line not accepted Cancelled 202 Discount query: order line not accepted Cancelled 203 Minimum order value not reached: order line not accepted Cancelled 205 Order line not accepted: quoted promotion is invalid Cancelled 206 Order line not accepted: quoted promotion has ended Cancelled 207 Order line not accepted: customer inelegible for quoted promotion Cancelled 210 Order line not accepted, substitute product is offered Substitution Available 220 Outstanding order line cancelled: reason unspecified Cancelled 221 Outstanding order line cancelled: past order expiry date Cancelled 222 Outstanding order line cancelled by customer request Cancelled 223 Outstanding order line cancelled - unable to supply Cancelled 300 Order line passed to new supplier Delayed 301 Order line passed to secondhand department Delayed 400 Backordered - awaiting supply Delayed 401 On order from our supplier Delayed 402 On order from abroad Delayed 403 Backordered, waiting to reach minimum order value Other 404 Despatched from our supplier, awaiting delivery Delayed 405 Our supplier sent wrong item(s), re-ordered Delayed 406 Our supplier sent short, re-ordered Delayed 407 Our supplier sent damaged item(s), re-ordered Delayed 408 Our supplier sent imperfect item(s), re-ordered Delayed 409 Our supplier cannot trace order, re-ordered Delayed 410 Ordered item(s) being processed by bookseller Delayed 411 Ordered item(s) being processed by bookseller, awaiting customer action Other 412 Order line held awaiting customer instruction Other 500 Order line on hold – contact customer service (usually because account is stopped) Other 800 Order line already despatched/stock allocated for despatch Order Confirmed 900 Cannot trace order line Other 901 Order line held: note title change Other 902 Order line held: note pubdate or availability date delay Delayed 903 Order line held: note price change Other 999 Temporary hold: order action not yet determined Other - Map the EDIFACT Status Code to a specific Vendor Response field value:
EDIFACT Status Code Descripción Vendor Response Field Value AB Publication abandoned (cancelled by publisher) Other AD Apply direct: item not available to trade Other AU Publisher’s address unknown Other CS Status uncertain: check with customer service Other FQ Only obtainable abroad Other HK Paperback out of print: hardback available Substitution Available IB In stock (at wholesaler or bookseller) Order Confirmed IP In print and in stock (at publisher) Order Confirmed MD Manufactured on demand Delayed NK Item not known (we cannot trace) - see also SN Other NM We do not supply this item Cancelled NP Not yet published Delayed NQ Not stocked Other NS Not sold separately Other OB Temporarily out of stock (at wholesaler or bookseller) Delayed OF This format out of print: other format available Substitution Available OP Out of print Cancelled OR Out of print: (to be) replaced by new edition Substitution Available PC Order in process, awaiting customer action Other PK Hardback out of print: paperback available Substitution Available PN Publisher no longer in business Other RE Awaiting reissue Delayed RF Refer to other publisher or distributor Other RM Remaindered Other RP Reprinting Delayed RR Rights restricted (cannot supply in this market) Cancelled SD Sold (for unique copies of secondhand/antiquarian items) Cancelled SN Our supplier cannot trace - see also NK Other SO Pack/set not available: available as single items only Substitution Available ST Stocktaking: temporarily unavailable Delayed TO Only to order Delayed TU Temporarily unavailable, reason unspecified Delayed UB Item unobtainable from our suppliers Cancelled UC Unavailable; may or may not become available again (“reprint under consideration”) Other - If the values of the two EDIFACT fields are mapped to two different Vendor Response values, use the following table to reconcile the differences:
Vendor Response Mapping for EDIFACT Action Code Vendor Response Mapping for EDIFACT Status Code Resulting Vendor Response Field Value Order Confirmed Order Confirmed Order Confirmed Order Confirmed Delayed Delayed Order Confirmed Cancelled Conflicting Codes Order Confirmed Substitution Available Substitution Available Order Confirmed Other Other Delayed Order Confirmed Delayed Delayed Delayed Delayed Delayed Cancelled Cancelled Delayed Substitution Available Substitution Available Delayed Other Delayed Cancelled Order Confirmed Conflicting Codes Cancelled Delayed Cancelled Cancelled Cancelled Cancelled Cancelled Substitution Available Conflicting Codes Cancelled Other Cancelled Substitution Available Order Confirmed Substitution Available Substitution Available Delayed Substitution Available Substitution Available Cancelled Conflicting Codes Substitution Available Substitution Available Substitution Available Substitution Available Other Substitution Available Other Order Confirmed Other Other Delayed Delayed Other Cancelled Cancelled Other Substitution Available Substitution Available Other Other Other
- Map the EDIFACT Action Code to a specific Vendor Response field value:
- Requires Attention - If the user has selected this option and the Vendor Response is set to something other than Order Confirmed, this value is set to Yes.
- Order Status - The system will set the Order Status to cancelled if this option is selected and any unreceived copies exist for an item with a Vendor Response of Cancelled.
- You will receive an e-mail notification as a result of the upload, detailing the items that were updated. This will include a table of items with the following columns:
- Title
- Order Item Number
- Price (if provided in the file)
- EDIFACT Codes - The specific EDIFACT codes used in the file for the item.
- Vendor Response - The value that the Vendor Response field was set to, based on the EDIFACT Codes above.
- Copies Cancelled - Number of copies cancelled, if this option was selected. (Can be 0.)
- Requires Attention - Whether the Requires Attention flag was set for the item.
- You can also set up an Automated Job to retrieve these files and import them automatically from the vendor. To do this, simply select "Import order response data (EDIFACT)" from the dropdown when creating a new automated job (Automated Jobs > Jobs > New Job).
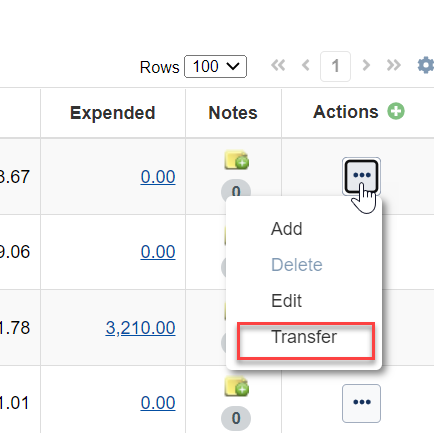
Improvements to the budget page
You can now view and use an improved budget page when view, editing and deleting funds within a budget. These changes will save you time and effort when creating new budgets or modifying existing budgets. These improvements include:
- New way to access the add, edit, delete, and transfer functionality for a fund.
- New way to edit a single fund, that helps return you to the right place on the page.
- New way to collapse/expand all funds on the budget page.
To use these new budget page improvements:
- Open a budget.
- For a specific fund, click on the "..." button in the Action column to access the actions for a fund. (Previously, these were represented as icons. Now they are in a menu.) You can:
- Add a fund (as a child fund to this fund)
- Edit a fund
- Suprimir un fondo
- Transfer money between funds
- To edit a specific fund, click on the Edit option in the "..." button in the Action column for a fund. This will now open a dialog rather than making the fund editable in-line. This has the advantage that when you save your changes, the position of your browser on the fund page does not change as much. (Previously with the in-line edit, the page would refresh and sometimes drop you on a different part of the page. This could be confusing and cause extra effort. It should do this less often now.)
- To collapse and expand all funds on the page, you need to click in the column header for the far-left column. This functionality was previously represented as links at the top of the budget page, but now it's a part of the column header.
Improved matching algorithm for importing MARC order records
You can now use an improved matching algorithm when importing MARC order item records without OCLC Numbers. This saves you time and effort of correcting incorrect matches after importing MARC order data. The specific improvements made were centered around the "quality" of the match (that is matching to the best record). It is unknown whether these changes will also improve the number of items matched, but it may. We will NOT be enabling this new matching algorithm for all libraries immediately. Instead, we are asking for volunteer libraries to try this new matching algorithm out before releasing it to all libraries. If your library wishes to volunteer, please contact OCLC support in your region (OCLC Support). They will coordinate turning on this new matching algorithm for your library. After turning it on, we will welcome your feedback on how successfully the new matching algorithm is. Additionally, we also have the capability for querying the database to ascertain the quality and quantity of matches. We can then feed this data to our matching team to further improve the matching algorithm.
To use this new matching algorithm:
- First contact OCLC support in your region (OCLC Support) and notify them of your interest to try this new matching algorithm.
- Once applied to your institution, you just need to import files as normal. If the file lacks an OCLC number or you select the option to validate the OCLC Number, the new matching algorithm will be used.
- Note: This new matching algorithm only impacts the primary matching process for importing MARC order data. The secondary matching process is unaffected, although we are looking currently into improvements for that process as well.
Bug fixes
Correct expenditure when changing the currency of the invoice
We now always calculate the correct expenditure for invoice items. Previously, there was a problem where the expenditure was being incorrectly calculated when the user did the following on the invoice:
- Opened an invoice.
- Set the currency of the invoice to a foreign currency and added items with prices.
- Set the exchange rate to something other than 1 for this invoice.
- Saved the changes.
- Changed the currency back to the institution currency.
- Saved changes, but made no other changes to the page.
- Immediately paid the invoice.
In this case, the previous exchange rate (set in step 3) was used for the invoice items, rather than the default exchange rate of 1.00 which should be used when the currency is set to the institution currency. If the user made changes to the invoice items before paying, the expenditure was updated and calculated correctly, but if they did not, it was calculated incorrectly. This bug will be fixed with this release, and additionally, we will contact libraries individually to notify them of the handful of cases where the expenditure was calculated incorrectly. For these libraries, we can either fix this expenditure for them or provide them with instructions for how to fix. Unfortunately, if this problem occurred on a closed budget, these expenditures cannot be rectified.
Cannot receive serial issue when new 853 is required
You can now receive issues even when the new issue requires the creation of a new 853 line in the LHR. A new 853 line is created when the enumeration or chronology of the issues changes from what they were previously. When this happened and you attempted to receive the issue, the system would give you an error and would not receive the issue or add the holding to the LHR. This was due to an underlying problem in Record Manager, which was fixed on October 15th. (This bug was a reoccurrence of a bug that was also fixed in the last release.)
Improved formatting of combined issues in EDIFACT serials claim message
You can now send improved data regarding combined issues in the EDIFACT serials claim message. In the EDIFACT serials claim message, there are two places we communicate issue information with the vendor, the PIA segment (which includes a SICI) and the IMD segment which contains free-form information about the serial issue. The IMD segment previously was not formatting combined issues properly. It was combining all chronology levels into one, such as December 31, 2021 - January 6, 2022 was (2021December31?:2022January6) instead of separating each chronology level as follows: (2021/2022?:December/January?:31/6). This has been corrected, and we are now displaying this information correctly.
Known issues
Budgeted amount history only goes back to July 2022
Currently, the budgeted amount history (detailed above) only goes back to July 2022. We plan to fix this, so that it goes back to January of 2019. This will happen in the next 1-2 releases.
Parent fund does not automatically expand when a child fund is added
When adding a child fund to a fund in the budget table, if the parent fund is collapsed, it remains collapsed, rather than being expanded automatically when the child fund is added. This can hide the recently added child fund from view temporarily.
Budget pie chart and totals not refreshed after making changes on the order or invoice
When you move away from the budget page to place an order or pay an invoice and then return, the totals and the pie chart at the top of the budget page are not refreshed. You have to close the budget page and re-open to refresh these values.
Important links
Support website(s)
Support information for this product and related products can be found at: