Configure Notify Patron messages
It is possible to create a set of saved Notify Patron messages. Staff can select from these, then add to or modify the text prior to sending a Notify Patron message. There are two elements to the configuration of the Notify Patron messages, Messages and Header, footer, subject, and report for messages.
Messages
Add a Notify Patron message
- Login to Table Maintenance.
- Click on the Miscellaneous tab.
- Click on Patron Messages.
- If desired, click Clear, to erase the existing data from the form.
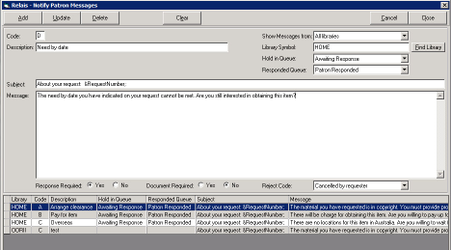
- Enter the information for the Notify Patron message.
- Click Add.
- Select the Hold in Queue. Typically, the message chosen is Awaiting Response.
- Select the Responded Queue. Typically, the message chosen is Patron Responded.
- Enter the description (maximum 50 characters). This is the text the staff sees in the Message drop-down box when selecting which message to use.
- Enter an optional subject line. If no subject line is configured then the subject associated with the header and footer is used.
Note: The subject is not used when sending a Notify Patron message for an ISO or generic script request. - Enter the text of the message. There is a maximum limit of 1,000 characters.
| Campo | Character | Descripción |
|---|---|---|
| Library symbol |
Enter your home library symbol. In a shared system, the library symbol is used to determine which Notify Patron messages to show to staff at each member library. When adding a new Notify Patron message, enter the library symbol for the library where this message is to be used. |
|
| Code | 1 | Enter a single-character code |
| Descripción | Enter a maximum of 50 characters. This is the text the staff sees in the Message drop-down box when selecting which message to use. | |
| Hold in queue |
If the Notify Patron message requires a response or document from the patron, then select the queue in which the request will sit while waiting for the response from the patron. Typically, Awaiting Response is used. |
|
| Responded queue | This is the queue in which the request will sit after the patron responds Yes to the message. Staff access these requests via Review Queue - Patron Responded. | |
| Show messages from |
Caution: In a shared system, select whether or not to show in this screen the Notify Patron messages of all member libraries or for a specific library. Default equals All libraries. |
Update a Notify Patron message
- Login to Table Maintenance.
- Click on the Miscellaneous tab.
- Click on Notify Patron.
- In the grid, highlight the message that needs to be updated.
- Modify the message as appropriate.
- Haga clic en Actualizar.
Delete a Notify Patron message
- Login to Table Maintenance.
- Click on the Miscellaneous tab.
- Click on Notify Patron.
- In the grid, highlight the message to be deleted.
- Modify the message as appropriate.
- Click Delete.
Header, footer, subject, and report for messages
Configure
- Login to Table Maintenance.
- Click on the Cover Pages tab.
- In the grid, highlight the request type for which to modify the header, footer, subject or report used.
- Click Notify/Cancel.
- Update the Subject, Header, Report or Footer as required.
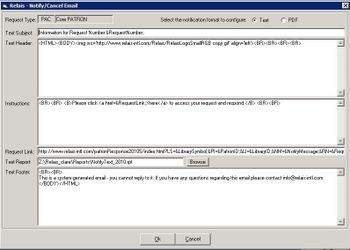
- The request number token can be used in the subject line. The token is replaced with the request number at the time the Notify Patron is created.
- Use basic HTML coding to ensure well-formatted emails. To use HTML coding, add <HTML> in the Header and </HTML> at the end of the footer. To add carriage returns for spacing, use <BR>.
- The default report used is NotifyText.rpt.
- NotifyText.rpt includes the following, if available:
- The text of the Notify Patron selected by staff along with any additional text entered
- Date request submitted
- Número de solicitud
- External Number
- Necesidad por fecha
- Author
- Title
- Volume, issue and pages
- Publication date
- Author of article
- Title of article
- ISSN
- ISBN
- Coste máximo
- Requester notes
- Requester information
- Additional notes from staff
- NotifyText.rpt includes the following, if available:
- If an alternate report is preferred, then browse the .rpt and click Open.