Saltar al contenido principal
Servicio de soporte de OCLC

Library registration

Learn how to use Library Registration to view, add, and modify library records in Relais ILL.

All libraries who send requests to you to be filled, with the exception of requests received via OCLC, must be registered, meaning a library record must exist in Relais.  

 Each library record may contain the following:

  • General library information, including delivery and address details
  • Statistical information
  • Billing information
  • Información de contacto
  • Login information 

Each library record must have a unique library symbol.  For example:

In addition, key information for your home library record is entered via Library Registration, for example, your OCLC Symbol.  

Retrieve or view a library record

To retrieve an existing library record:

  1. Login to Library Registration.
  2. Enter the unique library symbol (upper or lower case).  See below for Advanced Search options.  
    1. Enter the complete symbol using upper and lower case as appropriate, e.g., OORII or OOrii.  This is the most precise way to retrieve a library record.  
    2. Truncation (%) can be used.  For example, enter NSH% to retrieve:  NSHD, NSHDM and NSHS.
    3. If you are not sure whether the library symbol includes upper or lower case, then use truncation.  For example, enter oorii% to retrieve both OORII and OOrii. 
  3. Click Search or hit Enter.
    1. If no match is found, a pop up is displayed:  Record Not Found.  Click Ok to return to Library Registration.
    2. If an exact match is found, the library record is displayed. 
    3. If truncation was used, up to 50 records are returned.  The number of records is displayed next to the Library Symbol.  Use the down arrow to move through the library records retrieved.  

RelaisILL_Library_Registration.png

This search can be done from any of the following screens:  Library Registration, Statistical Information, Billing Information or Login Information.

Advanced Search options

To retrieve a library record using search criteria other than the library symbol.  

  1. Login to Library Registration.
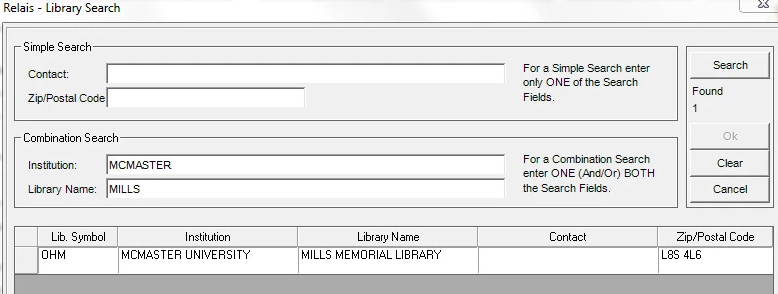
  2. Click Advanced to display Library Search.
  3. Search options are:
    • Simple Search terms can only be used alone.
      • Enter a contact name, e.g., Clare MacKeigan, or 
      • Enter a zip code or postal code, e.g, K2C 3R8.
    • Enter text strings from the name or the institution or the library.  These terms can be combined, e.g., McMaster and Mills Memorial.
    • Terms are automatically converted to upper case for searching.  
    • Terms are automatically truncated, no % is required.    
  4. Haz clic en Buscar.
  5. Results that match the search terms entered are displayed.
  6. Highlight a record and double click or click Ok to view the library record.

RelaisILL_Library_Search.png

To return to the list of records retrieved.  Click Advanced.  

Advanced search options are available from any of the following screens:  Library Registration, Statistical Information, Billing Information or Login Information.

Add a library record

  1. Login to Library Registration
  2. Start by checking to see if a library record already exists by searching Library Symbol.
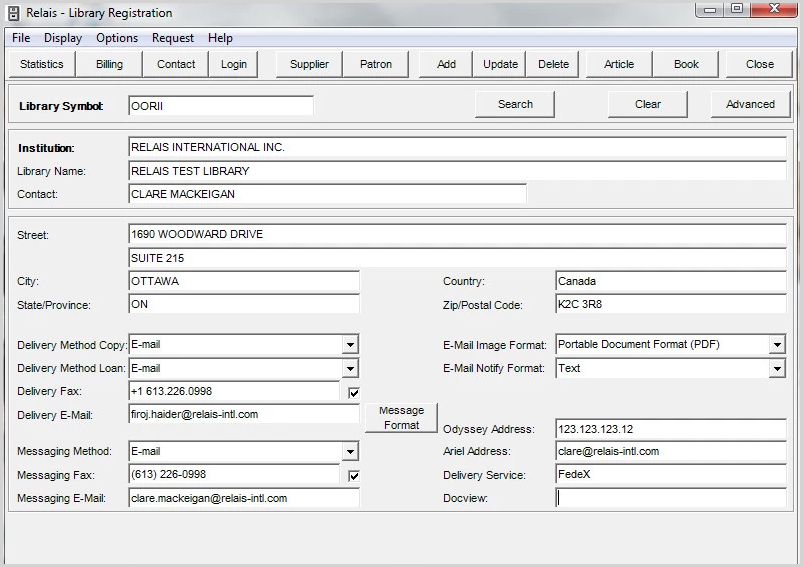
  3. If no record exists, enter the information in the Registration tab.  See the Registration field descriptions below.  
  4. Haz clic en Añadir.

There are four additional tabs you can use to add other information to an existing library record.  They are located along the top left hand side of the Library Registration screen and include:

Registration 

Field descriptions

Campo

Characters

Descripción

Library Symbol   The library symbol is case sensitive. The library symbol must be unique. For example, both OORII and OoRii are acceptable values for different library symbols.
Institución 100 Enter the name of the institution to which the library belongs, e.g., the name of the university. As text is entered it is automatically converted to upper case. The institution name is searchable via the Advanced Search options.
Library Name 100 Enter the name of the library or department. As text is entered it is automatically converted to upper case. The library name is searchable via the Advanced Search options.
Póngase en contacto con 50 Enter a contact name. As text is entered it is automatically converted to upper case. The contact name is searchable via the Advanced Search options.
Street (Line 1) 70  
Street (Line 2) 70  
Ciudad 40  
Estado/Provincia 20  
País 35  
Zip/Postal Code 15  
Delivery Method Copy   Select the library's preferred delivery method for copies. The default value is Mail.
Delivery Method Loan   Select the library's preferred delivery method for loans. The default value is Mail.  
Delivery Fax 25 Enter the fax number. A fax number must be entered if the Delivery Method Copy or Messaging Method is Fax.
Delivery Email 80 Enter the email address to use when sending copies via email. A Delivery Email address must be entered if the Delivery Method Copy/Loan is Email. Post to Web or Secure Post to Web.
Messaging Method   Select the library's preferred messaging method. The default value is Mail.
Messaging Fax 25 Enter the fax number to use when sending messages via fax. A Messaging Fax address must be entered if the Messaging Method is Fax.
Messaging Email 80 Enter the email address to use when sending messages via email. A Messaging Email address must be entered if the Messaging Method is Email.  
E-Mail Image Format   Select PDF or TIFF as the format to use when delivering documents to the patron. The default value is PDF.
E-Mail Notify Format   Select Text or PDF as the format to use when delivering messages to the library. The default value is Text.
Dirección de Odyssey 80

Enter the library's Odyssey address. For example: 209.183.21.34

If the library uses Odyssey in a shared environment then you must be sure to include their NVTGC site information as part of the Odyssey address. For example: 209.183.21.34/REL

Ariel Address 80 Enter the library's Ariel address (either an IP address or email address)
Delivery Service 9  
Docview 80  

 Note:  To enforce North American formatting for phone numbers and fax numbers un-check the box beside phone and fax.

Statistics

Once the library record is displayed, click Statistics tab and enter the following information as appropriate and click Update.

Field descriptions

Campo

Descripción

Símbolo de OCLC

Enter the library's OCLC symbol. This is used when receiving OCLC requests to match the OCLC symbol on the incoming request to the appropriate library record. As text is entered it is automatically converted to upper case. This is a searchable field.

For your home library record, enter your OCLC symbol. This is used when sending requests to OCLC WorldCat Resource Sharing via ISO ILL.

OCLC symbols are not used to generate statistics. 

User ID For your home library record only, enter your OCLC User ID. This is used when sending requests to OCLC WorldCat Resource Sharing via ISO ILL.
Contraseña For your home library record only, enter your OCLC Password. This is used when sending requests to OCLC WorldCat Resource Sharing via ISO ILL.
Confirm Retype your password to ensure you have entered it correctly.
Use IFM For your home library record only, select Yes or No. This is used when sending requests to OCLC WorldCat Resource Sharing via ISO ILL. If set to yes requests are sent to OCLC with an IFM flag. If set to Yes an IFM Max Cost must be set.
IFM Max in US$ For your home library record only and if Use IFM = Yes, enter the max cost to include when sending requests to OCLC WorldCat Resource Sharing.
Rapid ILL Code

Enter the library's Rapid ILL Code. This is used when receiving Rapid requests to match the Rapid code symbol on the incoming request to the appropriate library record. This is a searchable field.

For your home library record, enter your own Rapid ILL Code. This is used when sending request to Rapid.

Rapid ILL symbols are not used to generate statistics. 

Nombre de la sucursal For your home library record only, enter your branch name, if appropriate.
Allow Local For your home library record only, indicate whether requests for items held locally should be processed via Rapid ILL.
Nombre de usuario For your home library record only, enter your Rapid ILL user name.
Contraseña For your home library record only, enter your Rapid ILL password and confirm.
Confirm Retype your password to ensure you have entered it correctly.
 

If you use DOCLINE, enter the library's DOCLINE symbol. This is used when receiving requests from DOCLINE to match the DOCLINE symbol on the request to the library record. This is a searchable field.

NLNZ Symbol Used when the corresponding namespace has been selected as the registration source for ISO ILL messaging. 
FD Symbol Used when the corresponding namespace has been selected as the registration source for ISO ILL messaging. 
Agent Symbol

Enter the library's Agent symbol. This is used when receiving requests from an Agent system to match the Agent symbol on the incoming request to the appropriate library record. This is a searchable field.

Date Entered

This is a non-editable field that shows the date the library record was originally added to Relais.

Date Last Updated This is a non-editable field that shows the date the library record was last updated.
Loan Code

Select the loan code to use for this library. The loan code is used to automatically populate the due date when updating a request as a loan and to determine, when and how many overdue notices should be sent. The default value is None. However when a request is processed as a loan and if there is no loan code for the library record, the 'first' value in the loan code table is used by default.

For each library record a loan code is set – this is used to define the default number of days for a loan when the staff update a request as a loan – this default can be overridden by staff at the time the request is updated (similarly this code defines the defaults for the renewal period as well as overdues). 

Log in to Table Maintenance to view details for the loan and renewal periods as well as overdues.   Loan policies can also be configured in Table maintenance.

Maximum Cost/Maximum Days

It is possible to set for each library record a default Maximum Cost and Maximum Days. When a request is created for a library, the defaults are automatically entered in the Maximum Cost field. The Maximum Days field is converted to the value given in the Need by Date field.  These can be overridden at the time the request is submitted. 

User ID For your home library record only, enter your British Library User ID
Contraseña For your home library record only, enter your British Library Password.
Confirm Retype your password to ensure you have entered it correctly.
Stats Category #1 Select a statistical category for the library from the drop down list (if configured). The default value is None.
Stats Category #2 Select a second statistical category for the library from the drop down list (if configured). The default value is None.
Stats Category #3 Select a statistical category for the library from the drop down list (if configured). The default value is None.
Categoría Select a category for the library from the drop down list (if configured). The default value is None.
Library Type

Select a library type from the drop down list (if configured). The default value is None.

Rapid ILL Code

Enter the library's Rapid ILL Code. This is used when receiving Rapid requests to match the Rapid code symbol on the request to the appropriate library record. This is a searchable field.

For your home library record, enter your own Rapid ILL Code. This is used when sending request to Rapid.

Rapid ILL symbols are not used to generate statistics.  They are used only by the home library to record system symbols and id's; e.g. if the home library is interoperating with OCLC this is where the home library’s OCLC login and authorization info is stored. This also applies to Rapid ILL and Agent Symbol.

Nombre de la sucursal For your home library record only, enter your branch name, if appropriate.
Allow Local For your home library record only, indicate whether requests for items held locally should be processed via Rapid ILL.
Nombre de usuario For your home library record only, enter your Rapid ILL user name.
Contraseña For your home library record only, enter your Rapid ILL password.
Confirm Retype your password to ensure you have entered it correctly.
DOCLINE Symbol

If you use DOCLINE, enter the library's DOCLINE symbol. This is used when receiving requests from DOCLINE to match the DOCLINE symbol on the request to the library record. This is a searchable field.

NLNZ Symbol Used when the corresponding namespace has been selected as the registration source for ISO ILL messaging.  May have been replaced by the OCLC symbol.
FD Symbol Used when the corresponding namespace has been selected as the registration source for ISO ILL messaging.  May have been replaced by the OCLC symbol. 
Agent Symbol Agent Symbols are used only by the home library to record system symbols and id's, not to generate statistics.  This where the home library's Agent symbol information is stored. 
Date Entered

This is a non-editable field that shows the date the library record was originally added to Relais.

Date Last Updated This is a non-editable field that shows the date the library record was last updated.
Loan Code

Select the loan code to use for this library. The loan code is used to automatically populate the due date when updating a request as a loan and to determine, when and how many overdue notices should be sent. The default value is None. However when a request is processed as a loan and if there is no loan code for the library record, the 'first' value in the loan code table is used by default.

For each library record a loan code is set – this is used to define the default number of days for a loan when the staff update a request as a loan – this default can be overridden by staff at the time the request is updated (similarly this code defines the defaults for the renewal period as well as overdues). 

Details re the loan and renewal periods as well as overdues are defined and can be configured in Table Maintenance.

Maximum Cost/Maximum Days

It is possible to set for each library record a default Maximum Cost and Maximum Days. When a request is created for a library, the defaults are automatically entered in the Maximum Cost field. The Maximum Days field is converted to the value given in the Need by Date field.  These can be overridden at the time the request is submitted.

Facturación 

To add billing Information, once the library record is displayed, click Billing tab and enter the following information as appropriate and click Update.

Field descriptions

Campo

Descripción

Billing Type Default is None.
Billing Rate

It is possible to set a billing rate for each library record.  If set and billing amounts are defined (in Table Maintenance) this is used to calculate the price for the request, e.g., for the loan or copy provided to the library.  It is possible to specify that the cover page on each request be used as an invoice – alternatively the customer can extract data from the database to use in creating invoices.  

Billing Currency Default is None.
Número de cuenta  
Load Balancing Not used in Relais ILL.
Quota  Not used in Relais ILL.
Credit Card Default is None.
Name on Card  
Card Number  
Fecha de expiración  
Code  Three digit number usually found on the back of the credit card.

Póngase en contacto con

To add contact information for billing, select the Contact tab and enter the following information as appropriate and click Update.  

Field descriptions

Campo

Descripción

Aviso Not used in Relais ILL.
Notice Start Date Not used in Relais ILL.
Reply ISO SMTP

Used by the home library to indicate what address to use when sending out requests via ISO ILL.

Reply ISO TCP/IP Used by the home library to indicate what address to use when sending out requests via ISO ILL. 
Reply Address GSM Used by the home library to indicate what address to use when sending out requests via ISO generic script.
NCIP Server Library  The NCIP information is used to configure the home library’s NCIP server and associated information.

Inicio de sesión

To assign a login to a library for use with the Relais web forms for Institutions, select the Login tab and enter the following information as appropriate and click Update.

Field descriptions

Campo

Descripción

User ID Enter the User ID the library will use when logging in to the Relais web form.
Contraseña Enter the Password the library will use when logging in to the Relais web form.
Confirm Password Confirm the Password.

Modify or delete a library record

To modify a library record

  1. Login to Library Registration.
  2. Retrieve the library record to be modified.
  3. Make the changes as required.  It is not possible to update the Library Symbol for an existing record.  If the library symbol changes a new record must be created.  
  4. Haga clic en Actualizar.

To delete a patron record

  1. Login to Library Registration.
  2. Retrieve the library record to be deleted.
  3. Haz clic en Eliminar.

 Note:  Only library records to which there are no requests or no supplier records attached can be deleted.

Retrieve or view a library record from the Staff web

  1. Login to Library Registration
  2. Search options are - note the two search options cannot be used in combination:
    1. Enter the unique Library Symbol.  Library symbols are case sensitive.
      • Enter the complete symbol using upper and lower case as appropriate, e.g., OORII or OOrii.  This is the most precise way to retrieve a library record.
      • Truncation (%) can be used.  For example, enter NSH% to retrieve:  NSHD, NSHDM and NSHS.
      • If you are not sure whether the library symbol includes upper or lower case, then use truncation.  For example, enter oorii% to retrieve both OORII and OOrii.
    2. Enter a text string from the Institution Name.  Truncation (%) should be used.  
  3. Haz clic en Buscar.
    • If no match is found a pop up is displayed:  Record is not found.  Click OK to return to Library Registration
    • If an exact match is found the library record is displayed. 
    • If truncation was used and more than one record is found a pop up is displayed:  Multiple libraries are found.  Click OK to view the records.  Use the down box to move through the library records retrieved and click on the record you want to view.

Add a library record from the Staff web

  1. Login to Library Registration
  2. Check to see if a library record already exists.
  3. If no record exists, enter the information as described in the table below.  
  4. Haz clic en Añadir.  

Each library record must have a unique library symbol:

 Note: If a new record is added by inputting symbol & institution only, the Update button and Supplier Registration button are greyed out.  To continue editing the record or to add a corresponding supplier record, clear the record and retrieve it again.  At this point the Update button and Supplier Registration button become active.


Campo

Descripción

Library Symbol

The library symbol must be unique (see note above).  The library symbol is case sensitive.  For example, OORII and OoRii are different values.
Institución Enter the name of the institution to which the library belongs, e.g., the name of the university. As text is entered it is automatically converted to upper case. The institution name is searchable via the Advanced Search (Windows Login only) options.
Library Name Enter the name of the library or department. As text is entered it is automatically converted to upper case. The library name is searchable via the Advanced Search (Windows Login only) options.
Library Contact Enter a contact name. Text is automatically converted to upper case as it is entered. The contact name is searchable via the Advanced Search (Windows Login only) options.
Contact E-mail Enter the contact name's E-mail.  Note that this field is not automatically validated.
Contact Phone Enter the contact name's phone number.  Note that this field is not automatically validated.
Contact Fax Enter the contact name's fax number.  Note that this field is not automatically validated..
Stats Category 1 Select a statistical category for the library from the drop down list. The default value is None.
Stats Category 2  Select a statistical category for the library from the drop down list. The default value is None.
Stats Category 3  Select a statistical category for the library from the drop down list. The default value is None.
Street (Line 1) Street (Line 1) is required if Delivery Method Copy/Loan or Messaging Method is Mail
Street (Line 2)  
Ciudad  
Estado/Provincia  
País .
Zip/Postal Code  
Delivery Method Copy: Select the library's preferred delivery method for copies. The default value is Mail.
Delivery Method Loan: Select the library's preferred delivery method for loans. The default value is Mail.  
Delivery Fax Enter the fax number. If Delivery Method Copy is Fax then the Delivery Fax address is required.
Delivery Email Enter the email address to use when sending copies via email or Post to Web.  If Delivery Method Copy is Email, Post to Web or Secure Post to Web then Delivery Email is required.
Ariel Address Enter the library's Ariel address (either an IP address or E-mail address.) If Delivery Method Copy is Ariel then the Ariel Address is required.
Dirección de Odyssey Enter the library's Odyssey address. If Delivery Method Copy is Odyssey then the Odyssey Address is required.
Messaging Method Select the library's preferred messaging method from the drop down list. The default value is Mail.
Messaging Fax Enter the fax number to use when sending messages via fax. If Messaging Method is Fax then Messaging Fax is required.
Messaging E-mail Enter the email address to use when sending messages via email. If Messaging Method is Email then Messaging Email is required.