Staff logins
Each staff member that uses Relais to add, update, query, and process requests can be assigned his/her own login id and password. Each time this staff member updates a request the login id is included in the audit record for the request.

In addition to individual staff logins, there are several system-related logins used by the automated applications and web forms/services, SYSTEM and WWW respectively. By default three additional logins are created at the time of implementation: ADMIN, STAFF, and SCANNER.
Add a staff login
When a login is needed for a new staff member:
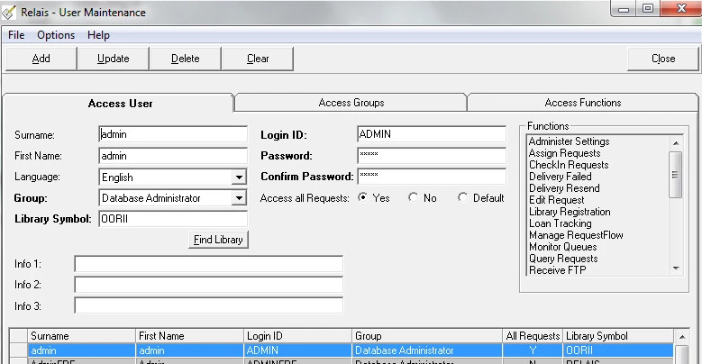
- Login to User Maintenance.
- Click the Access User tab.
- Enter the following information and click Add. (Fields marked in bold are mandatory - all others are optional).
| Campo | Characters | Descripción |
|---|---|---|
| Surname | Enter the staff member's surname. | |
| First Name | Enter the staff member's first name. | |
| Language | Select the staff member's preferred language. Default = English | |
| Grupo | Select the group to which the staff member belongs. | |
| Library Symbol | Enter the home library symbol with which the staff member is affiliated. Caution: This is critical for shared systems since this library symbol determines which requests the staff member is able to access and update - when used with the Access all Requests setting. For example, a staff login with library symbol is only able to access patron requests that are linked with the same library symbol. |
|
| Login ID | Enter the staff member's login. The login is case-sensitive. | |
| Password | Enter the staff member's password. The password is case-sensitive. | |
| Confirm Password | Re-enter the staff member's password. | |
| Access all Requests | In a shared system, specify whether the staff member is allowed to access all requests. Yes = The user is able to retrieve all requests when using Query. No = The user can only retrieve requests from their own patrons and for which their library is the current supplier. The default is set in the corresponding Access Group. The default is Yes. |
|
| Info 1 | Enter any other miscellaneous information for the staff member. | |
| Info 2 | Enter any other miscellaneous information for the staff member. | |
| Info 3 | Enter any other miscellaneous information for the staff member. |
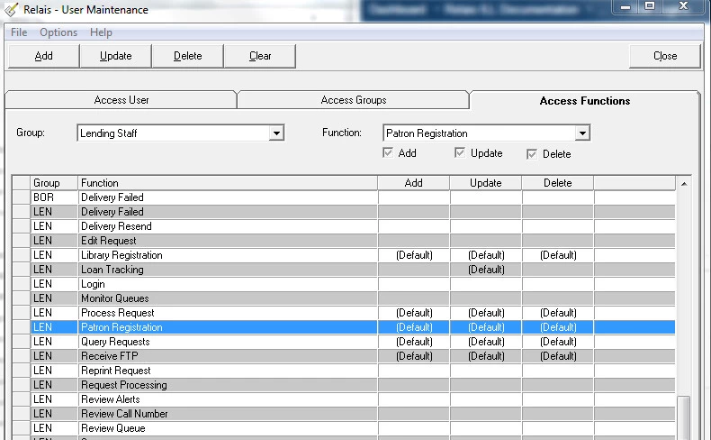
Limit staff functionality
The group to which a staff member belongs determines the functions they can access.
To remove specific functionality, e.g., Patron Registration, so that staff cannot access it.
- Login to User Maintenance.
- Click the Access Functions tab.
- Highlight the row which corresponds to the staff member's group and the function to be removed, e.g., LEN (Lending Staff) & Patron Registration.
- Click Delete and click Yes to confirm.
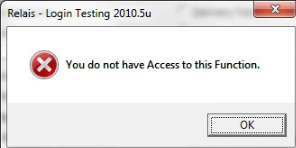
The next time a staff member that belongs to this group logs in and clicks Patron Registration, the following message displays:
It is also possible to modify the options that display on the Relais Login, e.g., to remove functions which staff cannot access.
Configure Add Document for Windows Login
- Login to Administer Settings.
- Select the Application Settings tab.
- Select Processing, Login, ADMINISTRATION.
- Click on Edit Extended Settings tab.
- Select Query Request tab.
At the Extended Query Requests Settings window make the following updates:
- Set "Starting folder for Add Document" to the location of your stored images.
- Set "File Storage Root for Add Document" to the location of the scanner folder in you Relais Root directory.
- Set "Use Transfer Service" to Yes.
- Select the Update tab.
Repeat for each instance of login you want to configure.
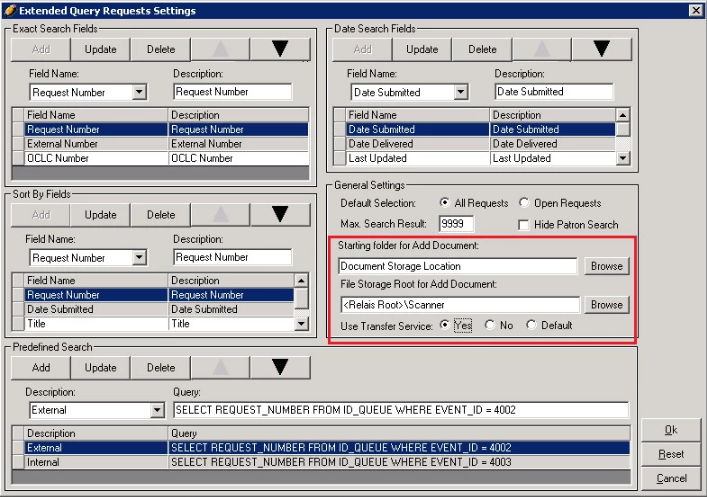
The value for “Starting folder for Add Document" should be the folder where you store images like pdf files. For example, you might store the files in a directory called: z:\images
Note that Relais does not automatically clear this directory after requests have been processed. But you can choose to delete them manually if you decide you no longer need them. Deleting files from this directory has no effect on the requests once they are processed.
Configure Add Document for Staff web
If you are using Add Document from Staff Web, certain lines in the relaisWeb.ini file on the ftp server must be present. The sections in the ini file to edit are FILE TRANSFER (these lines define where and how files are to be transferred) and ALLOW FILE TYPES (these lines define the kind of files which can be transferred).
Use the following example as a guide:
| Line | Descripción | Example |
|---|---|---|
| FTPServerAdress | The IP address for the machine where files are to be uploaded. | FTPServerAddress=192.168.x.y |
| FTPUserName | The username for the machine where files are to be uploaded. | FTPUserName=admin |
| FTPUserPassword | The password for the machine where files are to be uploaded. | FTPUserPassword=password |
| FTPMode | Determines how the data connection is established. Can be set to either Active (A) or Passive (P). | FTPMode=A |
| TempDirectory | The temporary location where a file is stored before it is transferred onto the FTP server. | TempDirectory=/usr/tomcat/webapps/access/WEB-INF/temp/ |
| DestinationFolder | The final location where a file is stored once it has been transferred onto the FTP server. | DestinationFolder=/images |
| ScannerFolder | The path where the file is stored. | ScannerFolder=R:\Relais\scanner |
ALLOW FILE TYPES
Each line in this section contains types of files allowed in order to upload them to the ftp server or write them to a Destination Folder. In particular, these settings contain file extensions. For example,
FileType_1=pdf
FileType_2=tiff
FileType_3=doc
Note: If this section is not configured then default file types are pdf, tif, jpg, bmp.