Hardware migration for Relais Hosted service
Some of these tasks can be completed prior to the migration, others post migration.
Pre-migration steps
Steps 1 through 3 can be completed any time prior to the hardware migration. The following steps must be completed on all workstations that run Relais.
Step 1. Download CreateODBC package
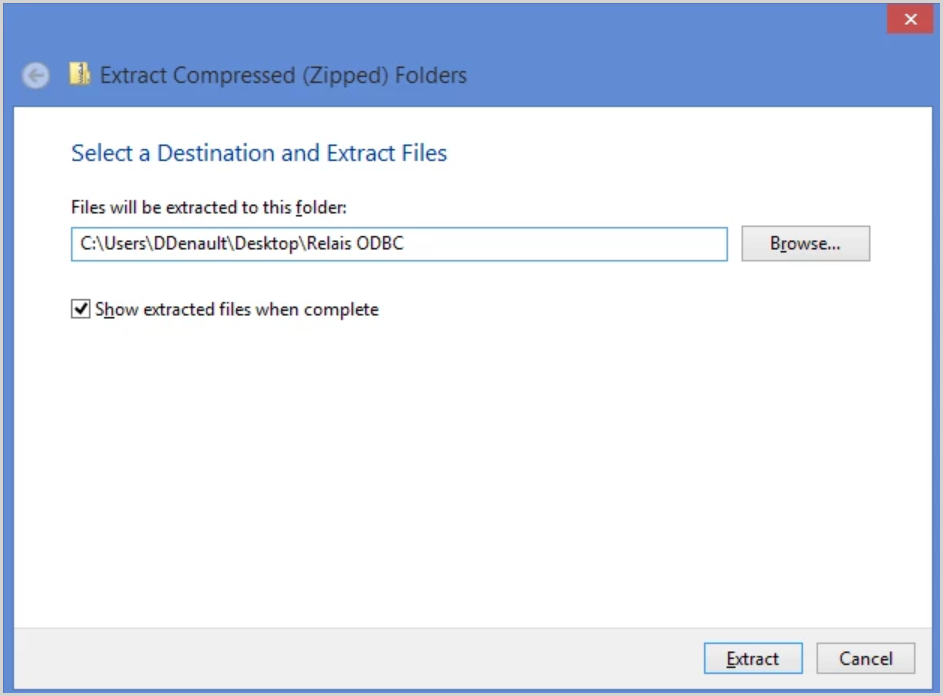
- Download the Create ODBC package and unzip it to the workstation desktop.
- The contents will be extracted to a folder on the workstation desktop called Relais ODBC.
- The following files are included:
- CreateODBC.exe
- RelaisRequestFlow2016.dll
- Relais.INI
Step 2. Update CreateODBC Relais.INI
This Relais.INI is provided as part of the CreateODBC package.
- Open the Relais ODBC folder.
- In the Relais ODBC folder, open Relais.INI in a text editor.
- For the DatabaseServer setting:
- Remove the semi-colon from the start of the setting.
- Set the communication port to 1433 or 1432, i.e. db0.relais-host.com,1433 or db0.relais-host.com,1432.
Note: Check your existing Relais.INI to confirm which port to use. If no port is defined in your production Relais.INI then the use the default port 1433.
-
Save and close Relais.INI in the Relais ODBC folder.
Step 3. Run CreateODBC.exe
In order for the CreateODBC.exe to run successfully and create the new ODBC connections, the user running this application MUST have Admin rights to enable editing of the Windows registry.
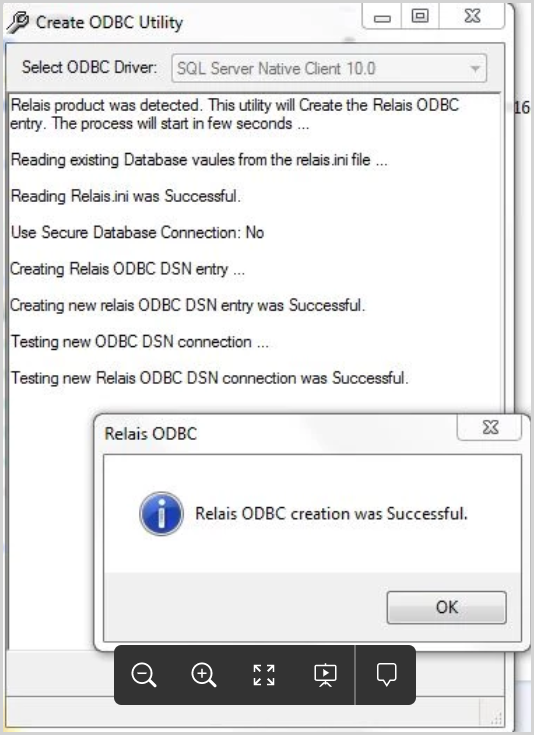
- Run CreateODBC.exe from the Relais ODBC folder on the workstation desktop. This will take several seconds before displaying its application window.
If either of the following two screens are presented when you launch CreateODBC, click OK or Run anyway to continue.


- The following screen will display when CreateODBC.exe has run successfully:
- When the new ODBC is confirmed to have been created successfully, delete the Create ODBC package folder from the desktop.
- If you do not receive a successful acknowledgement please contact OCLC Relais support.
Note: CreateODBC.exe must be run on each workstation where Relais is in use.
Post migration steps
Must be completed post migration. No requests can be submitted or staff updates done until these steps are completed.
Step 1. Update production Relais.INI
This update is to your production Relais.INI.
- Go to the Relais root directory and locate Relais.INI
- Open Relais.INI in a text editor
- In the [System Settings] update the following two settings:
- Change DatabaseServer=relais-host.com,port to DatabaseServer=db0.relais-host.com,port
- db0 - This is a zero not a capital o.
- port = 1433 or 1432.
- Change ODBCDataSource=RelaisHost to ODBCDataSource=DB0RelaisHost
- DB0 - his is a zero not a capital o.
- Change DatabaseServer=relais-host.com,port to DatabaseServer=db0.relais-host.com,port
- Save and close Relais.INI
Step 2. Run CreateODBC.exe
This step is only required if it was not completed pre-migration.
Note: In order for the CreateODBC.exe to run successfully and create the new ODBC connections, the user running this application MUST have Admin rights to enable editing of the Windows registry.
- Run CreateODBC.exe from the Relais root on the workstation. This will take several seconds before displaying its application window.
If either of the following two screens are presented when you launch CreateODBC, click OK or Run anyway to continue.
- The following screen will display when CreateODBC.exe has run successfully:
- If you do not receive a successful acknowledgement please contact OCLC Relais support.
Step 3. Update bookmarks to old staff pages
This step is only required it you are still using the old staff web pages (Relais Access) to process and update requests.
The host address (h1.relais-host.com , h2.relais-host.com ... ) to the old Relais Access staff forms will change. You will need to be update your bookmarked URLs to point to the new server addresses as appropriate for each customer.
You will be notified by OCLC Relais support in advance of your hardware migration what your new host address will be.
Step 4. Update the Relais File Transfer service settings
This step is only required if you are a Relais ILL customer using the Relais File Transfer service.
The following two updates must be made to your Relais File Transfer Service settings:
- Add a 0 (that is a zero not a capital o, followed by a period) to the end of ftp for the FTP Server:
- FTP Server - ftp0.relais-host.com
- Add db0 (that is zero not a capital o) to the beginning of relais-host.com for the Database Server
- Database Server - db0.relais-host.com
- Restart your Relais File Transfer service. See About Relais File Transfer Service for more information.