Manage users and repositories
Adding users to your account
Once you’ve registered your Gateway account, you can associate other users with it. To add a user:
- Go to the Gateway registration page.
- In the Add a user to your Gateway account section, provide the following information:
- The user’s e-mail address.
- The Gateway user name and password for this user.
- The user’s phone number.
- Your Gateway account key – This text string was included in the welcome e-mail from OCLC with your user credentials and account information.
- Click Add User. The new user will immediately be able to log in to your Gateway account.
Notes: Modifying or issuing CONTENTdm Gateway license keys to accommodate multiple users is a simple configuration. To accommodate additional users, you may send an e-mail request to OCLC Support and request that your existing key be modified to one of the other key options (10 users or 50 users).
Logging into the Gateway interface
You can log in to the Gateway directly at
https://worldcat.org/digitalcollectiongateway/login.jsp.
Or, you can log in via CONTENTdm Administration.
Adding repositories to your account
After you have registered your account with the Gateway, you need to associate your repositories with the appropriate Gateway key.
- Go to the Gateway login page.
- To log in to the Gateway, enter your username and password, and click Sign In.
- The first time you log in to the Gateway you will be asked to register a repository. Click OK to continue.
- If you’re not already in the Manage Account tab, click to select it now.
- Click Keys and Repositories.
- Click to select the key for which you want to add repositories.
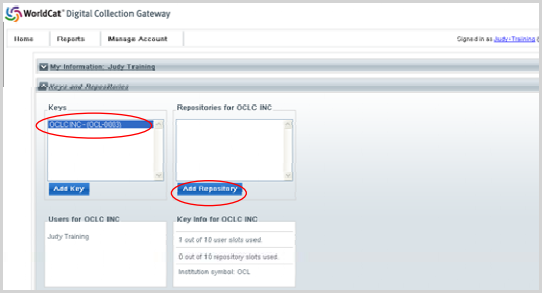
- Click Add Repository.
- When the Add Repository window appears, enter the OAI-PMH base URL for the selected repository. Then click Test.
- When the repository has been tested successfully, Gateway displays the message “All OAI tests passed.” You can now click Add to associate the repository with your Key.
- If the repository fails one or more of the Gateway tests, the Add Repository box indicates whether you can continue to add the repository nonetheless.
- After you have successfully added the repository, you’ll be able to edit and manage settings for the repository you just added.
Managing repository settings
From the Manage Account tab, you may select a repository and change two of its settings: Type and Show Sets.
- Select the Manage Account tab.
- If it is not already open, click to open the Keys and Repositories section.
- In the list of repositories, click to select the repository for which you want to view details.
- In the Repository area of the page, the following information is displayed:
- Institution symbol (OCLC symbol)
- Gateway license key • URL, name – the OAI-PMH base URL and name of this repository
- Type – To change the repository type, use the pull-down menu to select one of the following: CONTENTdm (pre version 5), DSpace, Fedora, Eprints, Digital Commons, or Other. After changing the type, you must click Change to save your choice.
- This informs OCLC staff about the type of OAI repository software that you own and is used for troubleshooting purposes. It is not used within the system to change capabilities. and is solely for troubleshooting purposes.
- You can use the Show Sets in Collection List? Pull-down menu to configure the way the Gateway harvests content from a repository.
- Your OAI repository allows you to manage sets (collections of records) separately in the Gateway. Using sets is the default approach. In the Gateway, a set name is the same as a collection name.
- By default, Show Sets in Collection List is Yes. This default setting allows you to set up different metadata maps for each collection (or set) in a repository.
- If you want to create a single metadata map for all records in your OAI repository, regardless of what collection the records are in, you can select No from the pull-down menu. Selecting No will create a special collection named Entire Repository. When you create a metadata map for that special collection, your mappings apply to the entire repository.
-
Note: If you select No, you cannot subsequently undo that setting in the Gateway. For this reason, we strongly recommend that you do not change the default setting. Moreover, with multiple sets, you may choose to apply one profile to several (or all) of the sets at any time.
Deleting repositories from your account
This functionality is limited to OCLC access, so if you would like to delete a repository in Digital Collection Gateway please contact OCLC Support.
Assigning collections to users
Since your license key may be used by more than one Gateway user, you can assign users with that key to particular collections. The users can then map metadata and synchronize with WorldCat for each collection to which they are assigned.
Note: Only one person can manage and edit a collection at a given time. Any registered user can use the Manage Account tab to assign a collection to themselves or another user.
- Select the Manage Account tab.
- In the Keys and Repositories section, select the repository containing the collections that you want to assign.
- In the Repository section, click to select a collection from the Active Collections list.
- To assign multiple collections to a user, hold down the Ctrl key and click to select each collection name.
- Click Assign Selected.
- Use the pull-down menu to select the user you want to assign to the highlighted collection(s).
- Click Assign.
- The collection is now assigned to the selected user.
- To assign this or any other collection to a user, repeat the preceding steps, using the pull-down menu.
Updating your personal information
To change your e-mail address, phone number or password:
- Select the Manage Account tab.
- Click to open the My Information section.
- In the User Details area, make any needed changes, and then click Change.