WorldShare Circulation release notes, Special March 2024
Release Date: March 26, 2024
Introduction
This release of WorldShare Circulation provides a new feature:
- New offline circulation client
Recommended actions
For this release, we recommend that you review the following checklists and complete the relevant tasks so that you can adjust your policies and workflows and train your staff. These checklists identify updates that we have determined as significant for most institutions. We encourage you to review all of the items in the release notes to determine whether there are other items that might require additional action or follow up by your institution.
Administrative actions
These items require immediate action or decisions.
| Action |
|---|
|
Determine when to switch your library over to the new WorldShare Circulation Offline Client.
Once your library has adopted the new client, you may wish to uninstall the legacy client from your workstations. |
New features and enhancements
New offline client for WorldShare Circulation
The new WorldShare Circulation Offline Client is now available for download . The offline client is a downloadable desktop application that allows you to track items that you check out and items that patrons return to the library while WorldShare Circulation is not available or while your library is unable to connect to WMS. These offline transactions can be uploaded when you are able to connect to WMS again.
The new client includes several significant improvements that have been requested by the WMS community. The new offline client:
- Does not require your machine to run Java.
- Does not require your library to maintain a WSKey for the WMS NCIP Service.
- Does not require your library to choose a user-to-act-as with appropriate permissions when downloading the client.
- In the new client, you will log into WorldShare prior to uploading transactions instead.
- Offers a modernized and fully translated user interface that supports the same languages as the WorldShare staff interface: English, French, German, Dutch, Spanish, etc.
- Offers a configurable due date that includes a timestamp to better support short loans.
- Can be downloaded from the OCLC Community Center even when WMS is not available.
- Includes a comprehensive, modern uninstaller.
- Improves error messaging when a transaction fails to upload, with no sensitive patron data stored in log files.
- Allows for zooming in and zooming out.
- Provides the choice to show or hide the footer.
- Provides options for checkout and check in tables:
- Show/hide columns in the tables with option to reset to default
- Clear transactions
- Filter by upload status
- Allows you to pin the application to your Windows taskbar.
Download the new offline client
Download the new offline client from the OCLC Community Center before 30 June 2024:
The new client will run with Windows 10 or 11. At this time, there is no version of the client for macOS or other operating systems.
- Download the WorldShare Circulation Offline Client 4.0.0 for 64-bit Windows
- Download the WorldShare Circulation Offline Client 4.0.0 for 32-bit Windows
After the download, a desktop shortcut will be created automatically and you may pin the new client to your taskbar, making it easier to run in a future session.
Checking out items
To check out items to a patron, follow the directions below:
- Open the new offline client.
- Click Checkout in the upper left corner of the screen.
- Enter the patron’s barcode and the barcode of the item.
- Set the due date, including time, using the calendar widget or by manually typing. Note: The system remembers the first due date chosen if you want to keep that for all subsequent checkouts. It will clear once you change tasks or tabs.
- Click the blue Check out button.
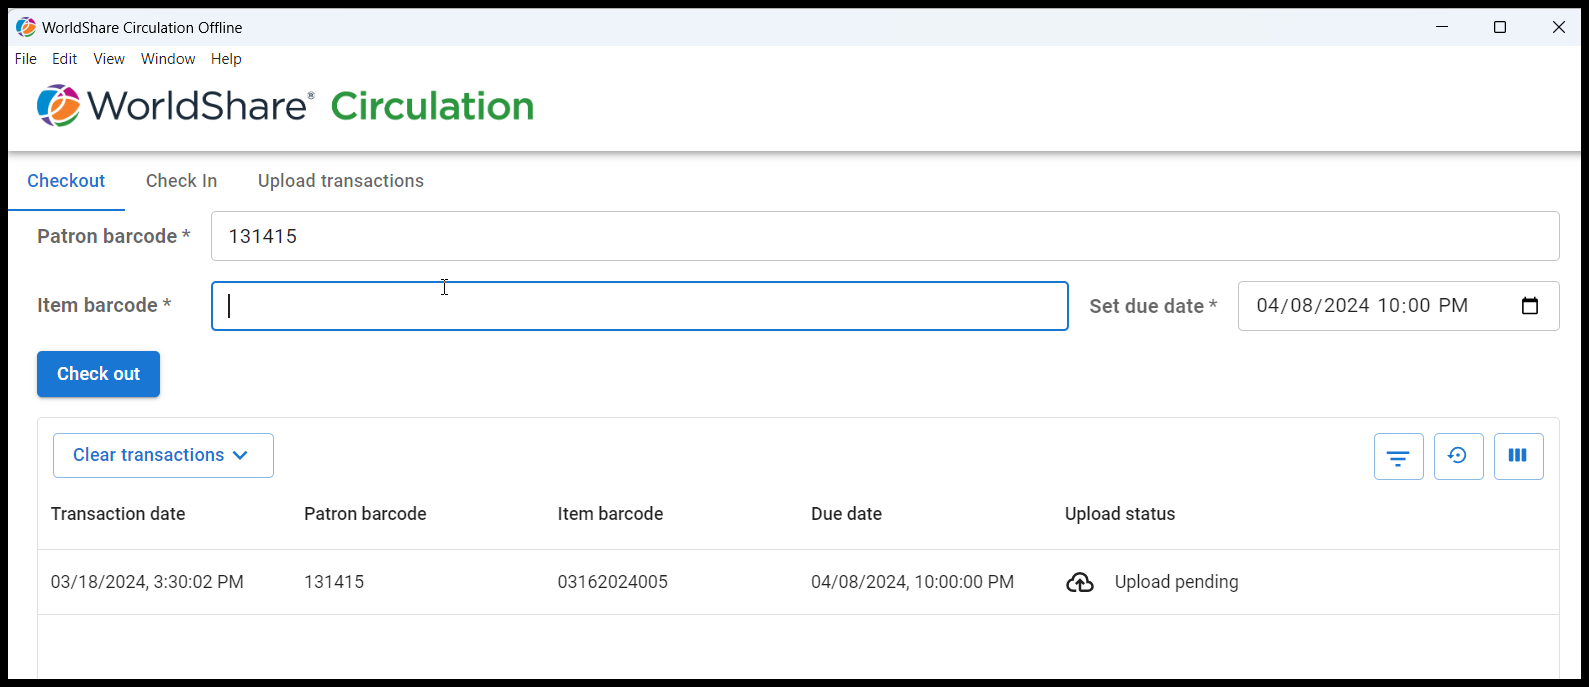
As you click the Check out button, items will be added to the table below with status Upload pending. See below for instructions for uploading your transactions when you are able to connect to WorldShare.
Your transactions will remain on your Checkout and Check In screens until you clear them or uninstall the client. See below for more information about clearing your transactions.
Checking in items
To check in items, follow the directions below:
- Open the new offline client.
- Click Check In in the upper left corner of the screen.
- Enter the barcode. Note: This capability is for items that were previously on loan. It cannot be used for checking in items from the Pull List and processing Holds, nor can it be used to check in items with the status of In Transient. The items must have the status of On Loan, Claimed, or Missing. It is not for Bulk checkin.
- Click the blue Check in button.
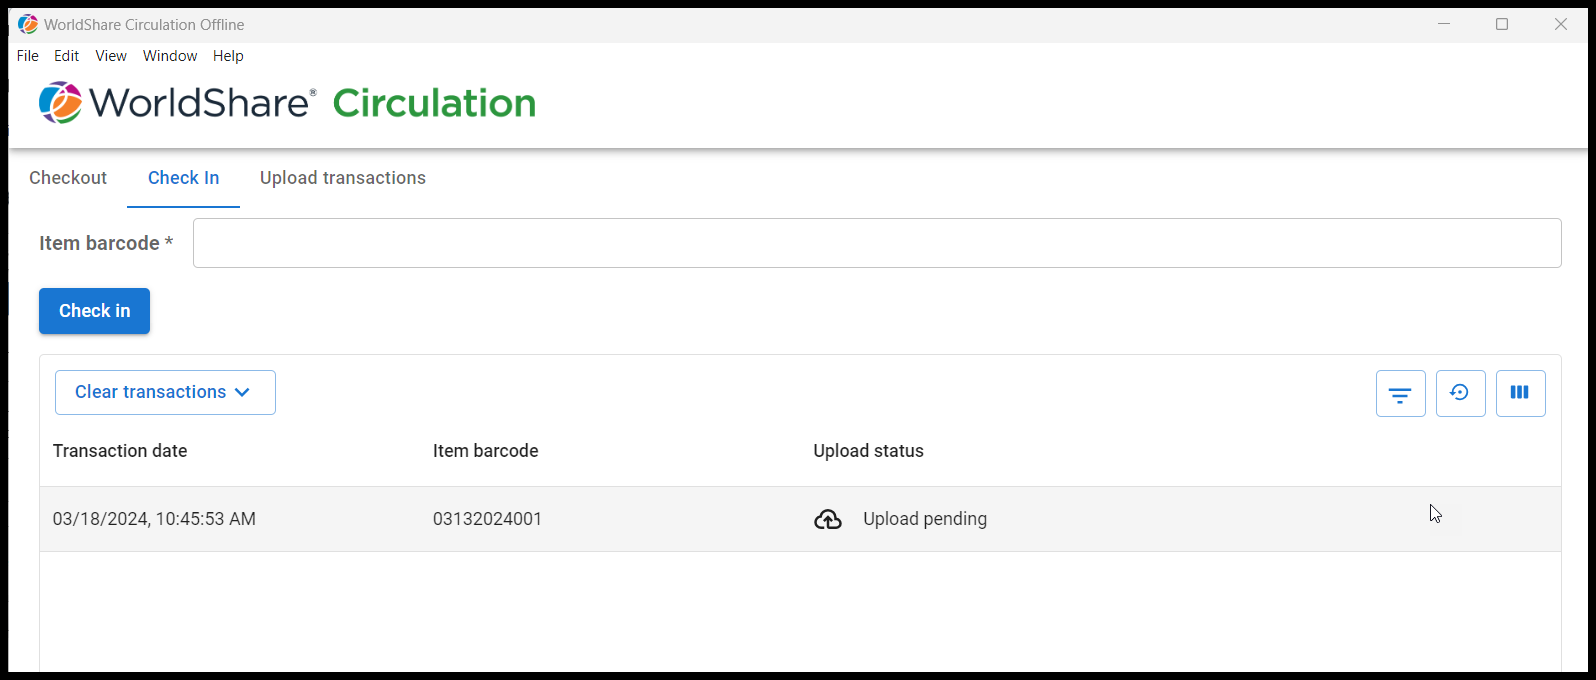
As you click the Check in button, items will be added to the table below with status Upload pending. See below for instructions for uploading your transactions when you are able to connect to WorldShare.
Your transactions will remain on your Checkout and Check In screens until you clear them or uninstall the client. See below for more information about clearing your transactions.
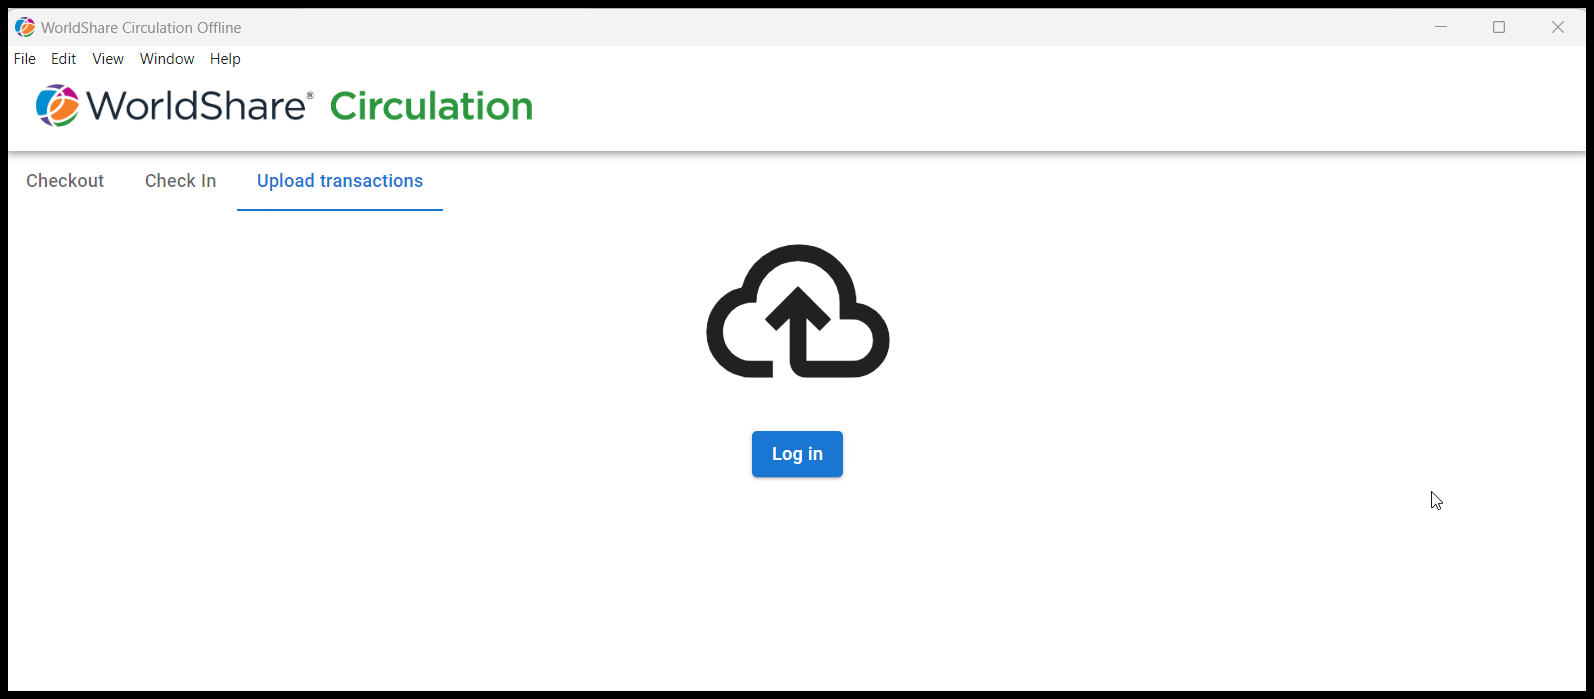
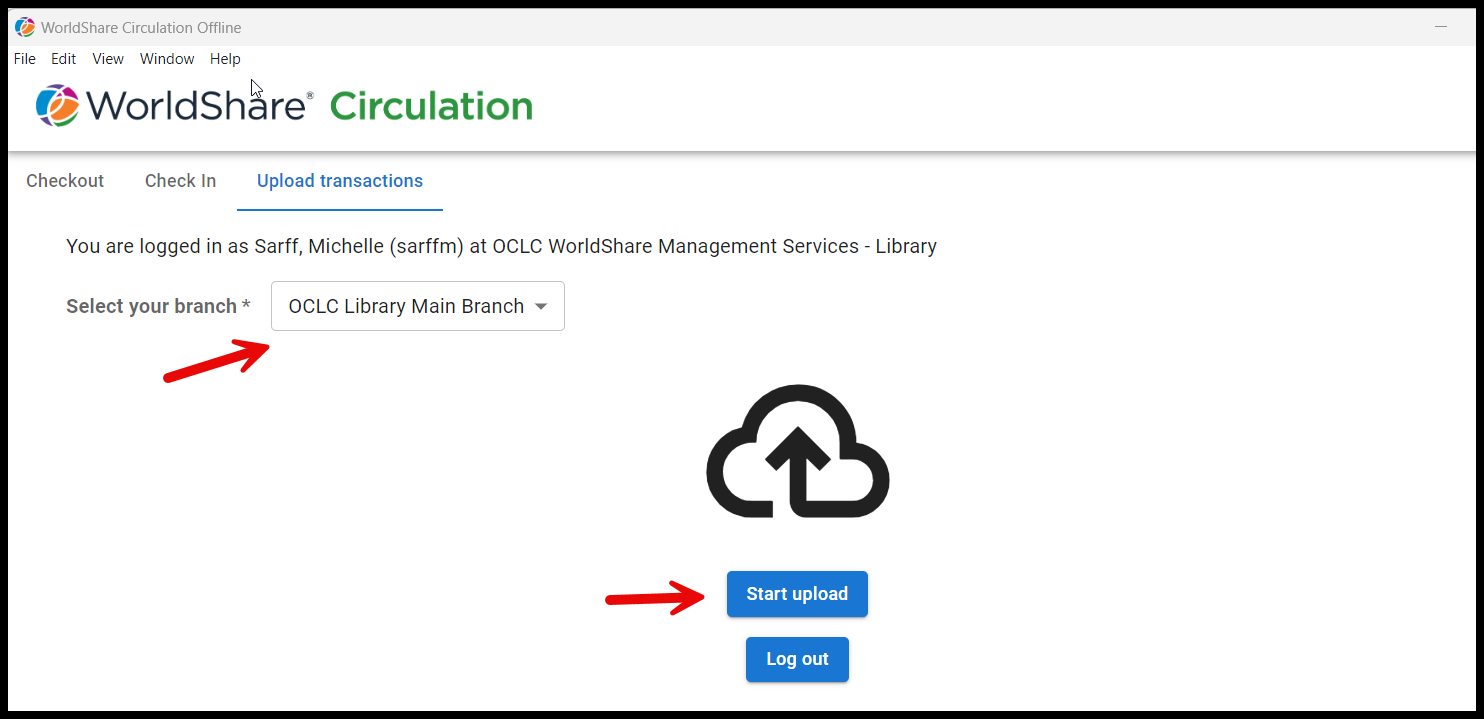
Uploading transactions
When you are able to connect to WMS and you are ready to upload your transactions, you must select your institution and log in.
Click on Upload transactions in the upper left corner of the screen after you have checked out or checked in some items.
Next, click the Log in button to open the Select an Institution dialog box:
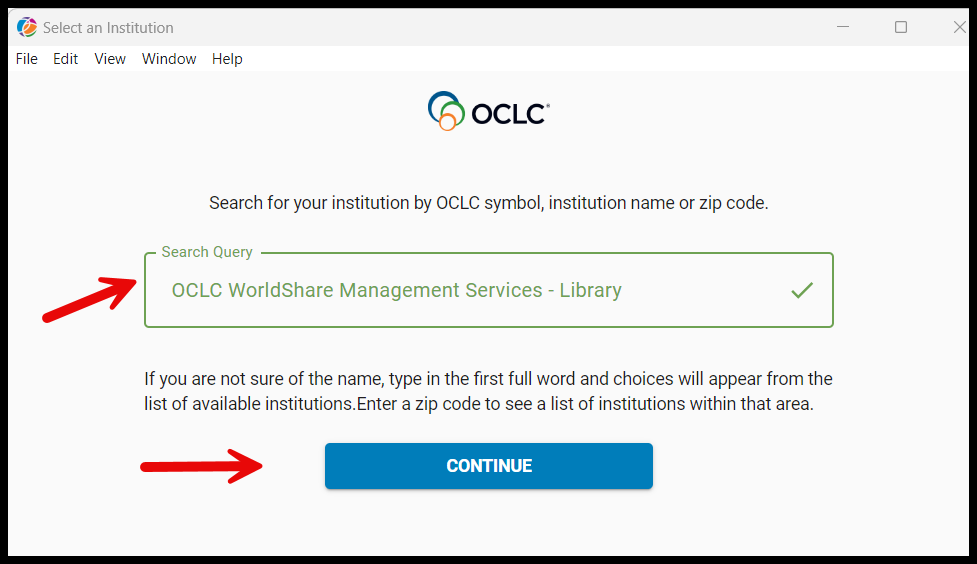
In the Select an Institution dialog box, identify the institution with which you are affiliated by typing your institution's OCLC symbol, name, or zip code in the Search Query box and then, once your institution shows up in the box, click Continue.
After identifying your institution, the client will remember this and each subsequent time you upload transactions, you will be able to choose to stay with this same institution or change institutions if you are affiliated with more than one:
Follow the prompts to sign in using the staff account you use for WorldShare Circulation. After successful authentication, you will be returned to the offline client. The client supports logging in with any of the authentication methods your library uses for the WorldShare staff interface. If your library has more than one identity provider (IdP), you will be asked to select your authentication method first.
After logging in, select the branch where the transactions were processed from the pull-down list and click Start upload. The upload action will process everything in date/time order:
As transactions are processed, a progress screen will appear, indicating the number of successful and any unsuccessful transactions. If a transaction has failed, the reason will be indicated under the Upload status column. For example, you will see the message Upload failed: Unknown item if the item barcode entered in the client is not known to Circulation. Only unsuccessful transactions will be visible in the table. You may choose to investigate your failed transactions further once you are connected to WorldShare Circulation.
Once upload progress has reached 100%, the client will display summary information about all the transactions processed.
- The client will provide a count of the transactions successfully processed out of the total number of transactions attempted.
- The client will provide a count of failed transactions that can be retried later out of the total number of failed transactions.
- The client will only retry failed transactions if there was a problem connecting to WMS when the upload was attempted.
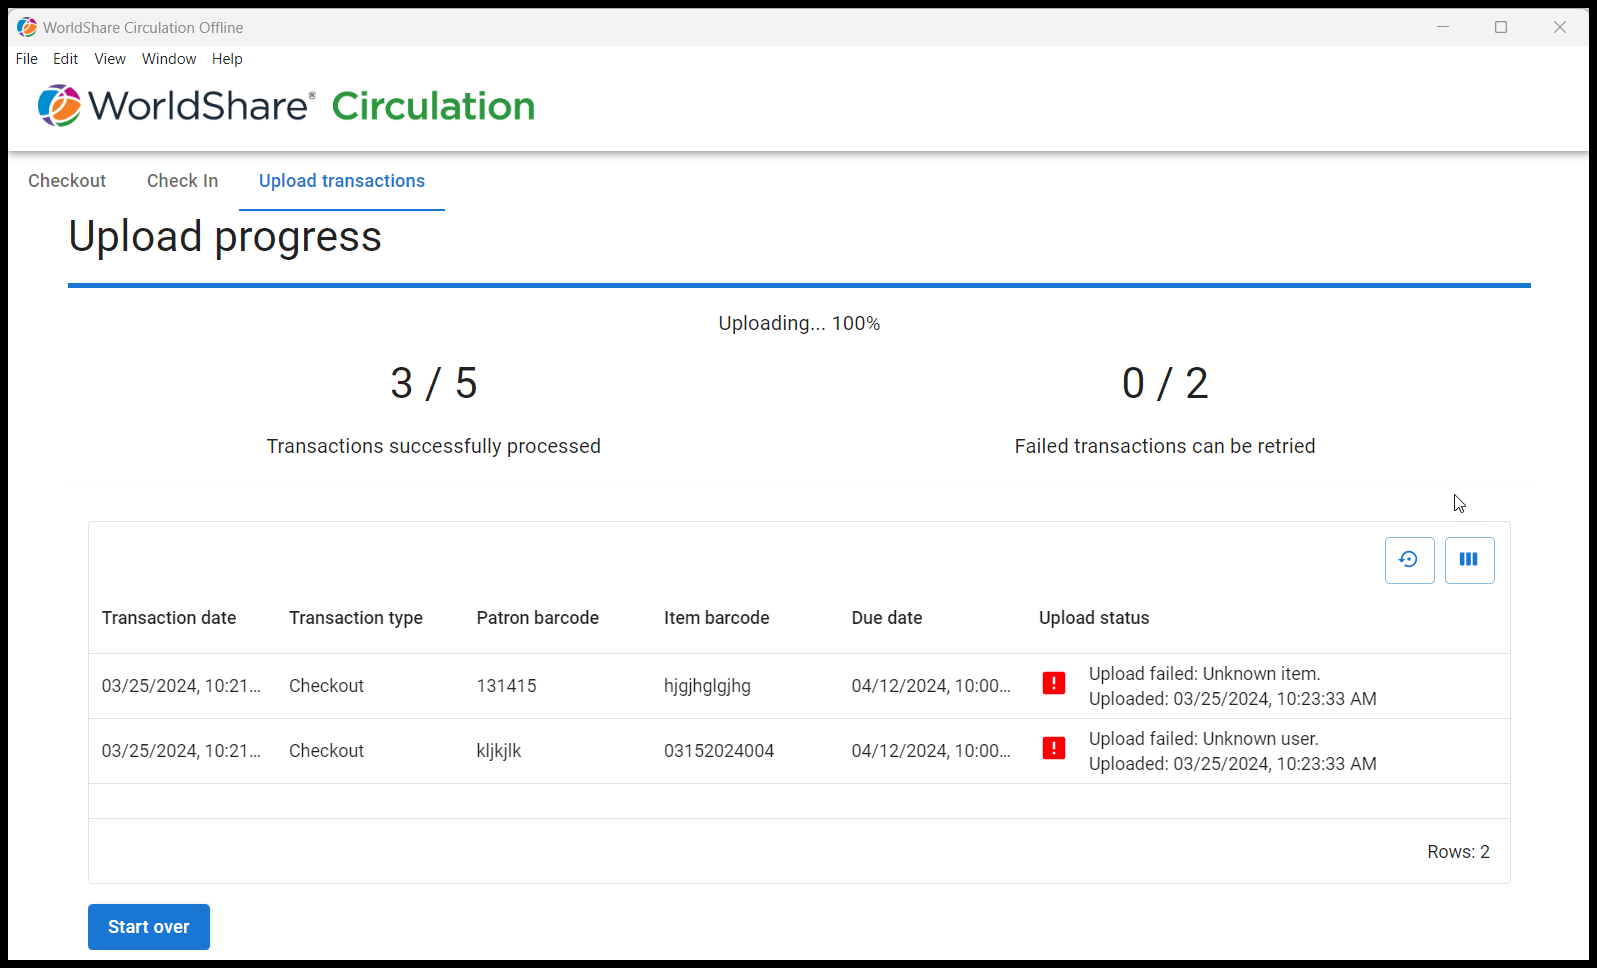
When processing is complete, you may click the Start Over button in the bottom left corner of the screen if there were any failed transactions that can be retried, or, if you have processed additional loans. When you are finished processing transactions for the day, you may close the client or log off without losing any pending transactions or the status of uploaded transactions. Even transactions that have been successfully uploaded will remain on your Checkout and Check In screens until you clear them. See below for more information about clearing your transactions.
Finally, you can view the status of each transaction by reviewing the list in the Checkout or Check In screens, including all successfully uploaded transactions.
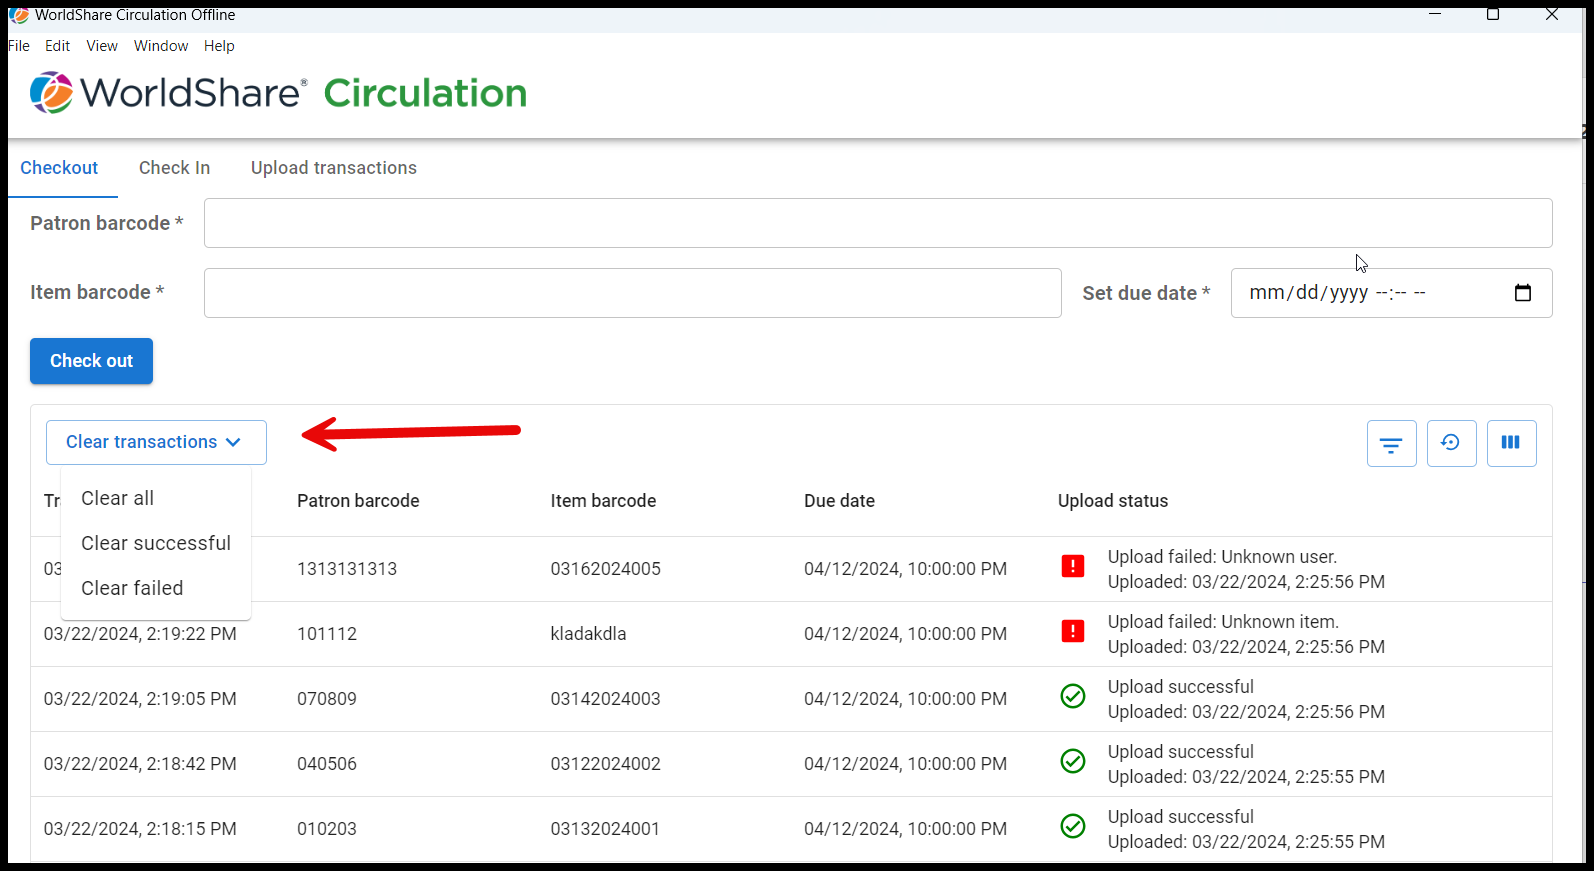
Clearing transactions
Transactions can be cleared from either the Check In or the Checkout screen. You may want to clear transactions after a successful upload to ensure that sensitive patron information is no longer visible in the client after it is no longer needed for processing.
To clear transactions, click on Clear transactions at the top of the table and choose Clear all to clear all transactions listed, Clear successful to only clear those that were uploaded successfully, or Clear failed to clear those transactions that failed to upload. You will be asked to confirm your choice before the transactions will be cleared.
Other features
You can change the size of the font and other elements by zooming in or out. Click on View in the top toolbar and click on either Zoom In or Zoom Out. Note that you can also zoom in or out by using Ctrl ++ or Ctrl --.

Also, the OCLC footer can be hidden to make more room on the screen to see transactions. Just click on the down arrow to hide the footer and click on the up arrow to bring it back again.
![]()
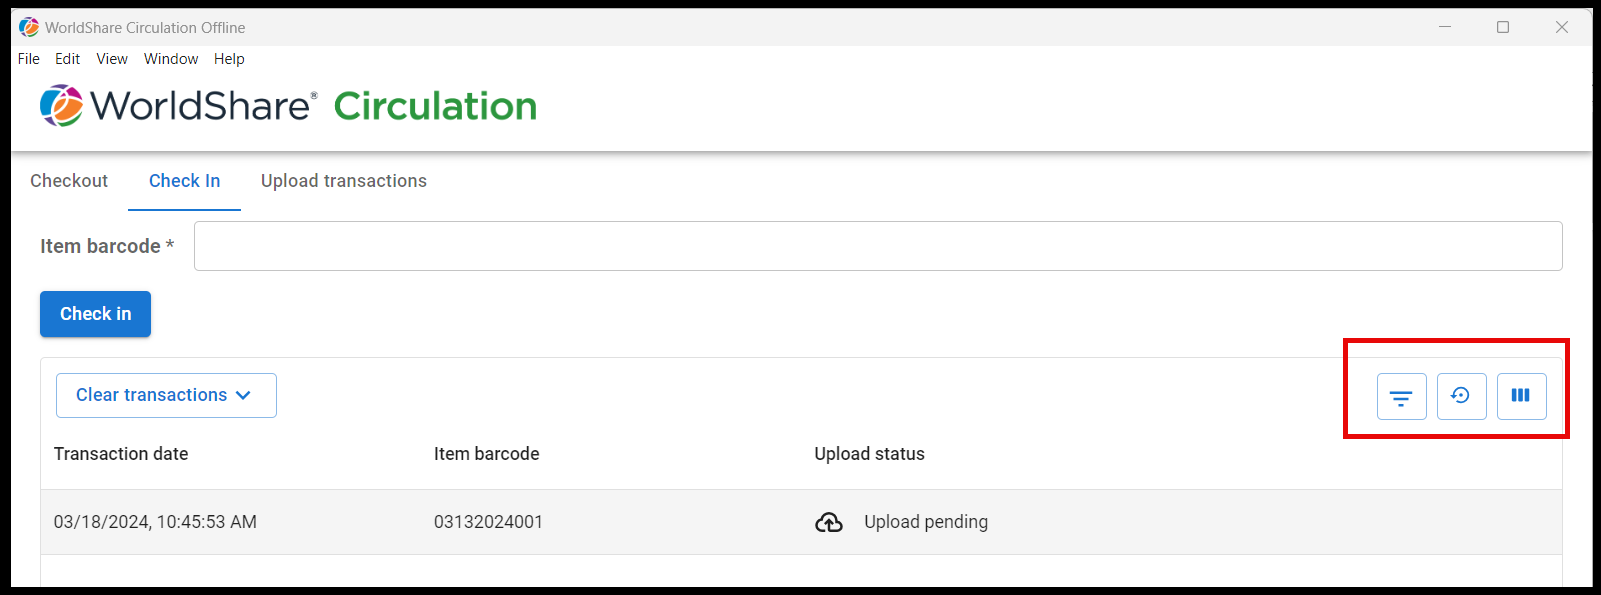
The list of transactions can be filtered by upload status and columns can be hidden and then reset by using the three buttons on the right side of the Checkout and Check In screens.
Logging out
When you are finished processing transactions for the day, you may close the client or log off without losing any pending transactions or the status of uploaded transactions. Even transactions that have been successfully uploaded will remain on your Checkout and Check In screens until you clear them or uninstall the client. See above for more information about clearing your transactions.
OCLC recommends deciding your library's procedure in advance for logging out or closing the client in order to adhere to any local guidelines for managing patron data.
Important: Uninstall the legacy offline client
Once you've downloaded and adopted the new client, you may safely uninstall the legacy client from all workstations. This process will allow you to make sure no private data remains on your workstation.
Caution: Be sure to upload any pending transactions in the legacy client prior to 21 April 2024. Do not delete the legacy client until you are sure that all pending transactions have been successfully uploaded or are no longer relevant.
To fully uninstall the legacy client, find and delete the following folders and files:
- wms-offline-circulation.jnlp
- File that you execute to run the legacy client
- derby.log
- Database for the legacy client
- All program files in the wms-offline-circ folder
- Default location is usually C:\Users\jsmith\wms-offline-circ
After completing the steps above, Java can be removed from your workstation if it is not needed for anything else.
Note: Assistance from your IT department may be required for some of the uninstall procedures.
Important links
Support website(s)
Support information for this product and related products can be found at: